
Operation Manual


541
USING PHOTOSHOP
3D
Last updated 12/5/2011
Creating 3D objects and animations (Photoshop
Extended)
Create 3D repoussé (Photoshop Extended)
The term repoussé describes a metalworking technique in which object faces are shaped and patterned by hammering
on the opposite side. In Photoshop, the Repoussé command converts 2D objects into 3D meshes, which you can
precisely extrude, inflate, and reposition in 3D space.
The Repoussé command works with RGB images. If you start with a grayscale image, Repoussé converts it to RGB.
The Repoussé command is not available for CMYK or Lab images.
For a video about converting from 2D to 3D with Repoussé, see www.adobe.com/go/lrvid5003_ps_en
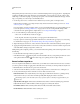
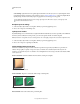
Applying Repoussé to a pixel selection
A. Increasing the depth of extrusion B. Twisting the extrusion 180° C. Inflating the front
1 Create a pixel selection, or select a text layer, layer mask, or work path.
2 Choose 3D > Repoussé, then choose the item that reflects your selection in step 1.
3 Set the following options:
Mesh tools Available along the upper left of the dialog box, these tools function like 3D object tools. See “Move,
rotate, or scale a model with 3D object tools” on page 522 and Move, rotate, or scale selected items with the 3D Axis.
Repoussé Presets Apply a predefined group of settings. To create your own preset from custom settings, click the
pop-up menu
, and choose New Repoussé Preset.
To organize groups of presets, see “Work with the Preset Manager” on page 47.
Extrude Extends the original 2D shape in 3D space. Depth controls the length of extrusion; Scale controls the
width. Select Bend for a curved extrusion, or Shear for a straight one, then set X and Y Angle to control the
horizontal and vertical tilt. If desired, enter Twist in degrees.
To change the bend or shear origin, click a point on the reference icon .
Inflate Expands or collapses the middle of the front or back. Positive Angle settings expand, negative collapse.
Strength controls the level of inflation.
Materials Apply materials such as brick or cotton either globally or to various sides of the object. (Bevel1 is the front
bevel; Bevel2 the back.) For more information, see
“Apply, save, or load material presets” on page 531.
Bevel Applies beveled edges to the front or back of the object. Contour options are similar to those for layer effects.
See
“Modify layer effects with contours” on page 267.
ABC