
Operation Manual


535
USING PHOTOSHOP
3D
Last updated 12/5/2011
To quickly aim a light at a specific area, Alt-click (Windows) or Option-click (Mac OS) in the document window.
Pan tool (Spot and point lights only) Moves the light to a different position in the same 3D plane.
Slide tool (Spot and point lights only) Moves the light to a different 3D plane.
Point Light at Origin (Spot light only) Directs light at the center of the model.
Move to Current View Places light in the same position as the camera.
To precisely position image-based lights, use the 3D Axis, which wraps the image around a sphere. (See “3D Axis
(Photoshop Extended)” on page 523.)
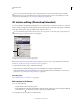
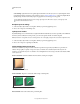
Add light guides
Light guides provide spatial reference points for your adjustments. These guides reflect the type, angle, and attenuation
of each light. Point lights appear as a ball, spot lights as a cone, and infinite lights as a line.
❖ At the bottom of the 3D panel, click the Toggle icon , and select 3D Light.
You can change the guide color in the 3D section of the Preferences dialog box.
Light Guides:
A. Point light B. Spot light C. Infinite light
Save, replace, or add groups of lights
To store groups of lights for later use, save them as a preset. To include the preset in other projects, either add to or
replace the existing lights.
❖ From the 3D panel menu , select any of the following:
Save Lights Preset Saves the current group of lights as a preset that you can reload with the following commands.
Add Lights To the existing lights, adds a lights preset that you select.
Replace Lights Replaces the existing lights with a preset that you select.
3D painting (Photoshop Extended)
You can use any Photoshop painting tools to paint directly on a 3D model just as you would on a 2D layer. Use
selection tools to target specific model areas or let Photoshop identify and highlight paintable areas. 3D menu
commands let you clear away areas of a model to access interior or hidden portions for painting.
A
B
C