
Operation Manual

532
USING PHOTOSHOP
3D
Last updated 12/5/2011
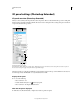
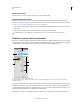
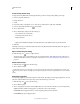
Click the material preview to display the preset pop-up panel.
1 In the 3D panel, click the material preview.
2 In the preset pop-up panel, do any of the following:
• To apply a preset, double-click a thumbnail preview.
• To create a preset from the current texture settings, click the pop-up menu icon , and choose New Material.
• To rename or delete selected presets, click the pop-up menu icon, and choose Rename or Delete Material.
• To save the current group of presets, click the pop-up menu icon, and choose Save Materials.
• To change the displayed group, click the pop-up menu icon. Then choose Reset Materials to restore a saved
group, Load Materials to append a saved group, or Replace Materials.
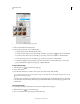
Create a texture map
1 Click the folder icon next to the texture map type.
2 Choose New Texture.
3 Enter the name, dimensions, resolution, and color mode for the new map, then click OK.
To match the aspect ratio of an existing texture map, view its dimensions by hovering the mouse pointer over the
map name in the Layers panel.
The name of the new texture map is displayed next to the texture map type in the Materials panel. It is also added
to the texture list under the 3D layer in the Layers panel. The default name is the texture map type appended to the
material name.
Load a texture map
You can load an existing 2D texture file for any of the nine available texture map types.
1 Click the folder icon next to the texture type.
2 Choose Load Texture, then select and open the 2D texture file.