
Operation Manual

530
USING PHOTOSHOP
3D
Last updated 12/5/2011
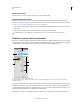
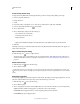
To see a thumbnail of a texture map image, hover the mouse over the texture name (for example, Reflection or
Illumination).
Diffuse The color of the material. The diffuse map can be a solid color or any 2D content. The Diffuse color swatch
value sets the diffuse color if you choose to remove the diffuse texture map. You can also create a diffuse map by
painting directly on the model. See
“3D painting (Photoshop Extended)” on page 535.
Opacity Increases or decreases opacity of the material (0-100%). You can use a texture map or the scrubby slider to
control opacity. The grayscale values of the texture map control the opacity of the material. White values create
complete opacity and black values create complete transparency.
Bump Creates bumps in the material surface, without altering the underlying mesh. A bump map is a grayscale image
in which lighter values create raised surface areas and darker values create flatter surface areas. You can create or load
a bump map file, or begin painting on the model to automatically create a bump map file. See
“3D painting (Photoshop
Extended)” on page 535.
The Bump field increases or reduces bumpiness. It is only active if a bump map exists. Enter a number in the field or
use the scrubby slider to increase or decrease bump strength.
Bumpiness is most pronounced when a surface is viewed head on, rather than at an angle.
Normal Like a bump map texture, a normal map increases surface detail. Unlike a bump texture map, which is based
on a single-channel grayscale image, a normal map is based on a multi-channel (RGB) image. The values of each color
channel represent the x, y, and z components of a normal on the model surface. A normal map can be used to smooth
the surfaces of low polygon meshes.
Note: Photoshop uses World-space normal maps, which offer the fastest processing.
Environment Stores the image of the environment surrounding the 3D model. Environment maps are applied as
spherical panoramas. The contents of the environment map can be seen in the reflective areas of the model.
To prevent an environment map from reflecting on a given material, change Reflectivity to 0%, add a reflectivity map
that masks the material area, or remove the environment map for that material.
Reflection Increases the reflection of other objects in the 3D scene, and the environment map, on the material surface.
Illumination Defines a color that doesn't rely on lighting to display. Creates the effect that the 3D object is lit from
within.
Gloss Defines the amount of light from a source that reflects off the surface and back to the viewer. You can adjust
glossiness by entering a value in the field or using the scrubby slider. If you create a separate glossiness map, the
intensity of colors in the map controls glossiness in the material. Black areas create full glossiness, white areas remove
all glossiness, and middle values reduce the size of a highlight.
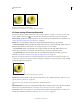
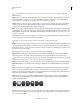
Shine Defines the dispersion of the reflected light generated by the Gloss setting. Low shininess (high dispersion)
produces more apparent light, with less focus. High shininess (low dispersion) produces less apparent light and
brighter, crisper highlights.
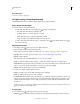
Adjusting Gloss (left number) and Shine (right number)
Note: If a 3D object has more than the nine texture types Photoshop supports, additional textures appear in the Layers
panel and the 3D Paint Mode list. (To display the latter, choose 3D > 3D Paint Mode, or use the Paint On menu in the
Scene section of the 3D panel).
0% / 0% 100% / 0% 0% / 100% 50% / 50% 50% / 100%100% / 50% 100% / 100%