
Operation Manual

528
USING PHOTOSHOP
3D
Last updated 12/5/2011
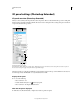
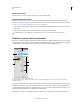
View cross sections
You can view a cross section of a 3D model by intersecting it with an invisible plane that slices through the model at
any angle and displays content only on one side of the plane.
1 Select Cross Section in the bottom section of the Scenes tab.
2 Choose options for alignment, position, and orientation:
Plane Select to display the intersecting plane that creates the cross section. You can choose plane color and opacity.
Intersection Select to highlight the areas of the model that the cross section plane intersects. Click the color swatch
to select the highlight color.
Flip Cross Section Changes the displayed area of the model to the opposite side of the intersecting plane.
Offset and Tilt Use Offset to shift the plane along its axis, without changing its tilt. At a default offset of 0, the plane
intersects the 3D model at its midpoint. At maximum positive or negative offsets, the plane moves beyond any
intersection with the model. Use Tilt settings to rotate the plane up to 360
0
in either of its possible tilt directions.
For a particular axis, the tilt settings rotate the plane along the other two axes. For example, a plane aligned to the
y-axis can be rotated around the x-axis (Tilt 1) or the z-axis (Tilt 2).
Alignment Select an axis (x, y, or z) for the intersecting plane. The plane is perpendicular to the selected axis.
Apply different render modes to each cross section
You can vary the render settings for each side of a cross section to combine different views of the same 3D model, such
as Wireframe with Solid.
1 Select Cross Section, and choose options in the bottom section of the Scenes tab. Your current render settings are
applied to the visible cross section.
2 Click Render Settings, or choose 3D > Render Settings.
3 At the top of the dialog box, click the currently unselected Cross Section button .
By default all render settings are turned off for the alternate cross section, making it appear invisible.
4 Choose render options for the alternate cross section, and click OK.
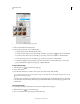
3D Mesh settings (Photoshop Extended)
Each mesh in the 3D model appears on a separate line in the top section of the 3D panel. Select a mesh to access mesh
settings and information in the lower section of the 3D panel.
Information includes the number of materials and textures applied to the mesh, as well as the number of vertices and
faces it contains. You can also set the following mesh display options:
Note: Too see shadows, you must set lights and select Ray Traced for render quality. See “3D Scene settings (Photoshop
Extended)” on page 527.
Catch Shadows Controls whether the selected mesh displays shadows on its surface from other meshes.
Note: To catch shadows from the ground plane on meshes, select 3D > Ground Plane Shadow Catcher. To align these
shadows with objects, select 3D > Snap Object To Ground Plane.
Cast Shadows Controls whether the selected mesh casts shadows on other mesh surfaces.
Invisible Hides the mesh, but displays any shadows on its surface.
Shadow Opacity Controls the softness of shadows cast by the selected mesh. The setting is particulary helpful when
blending 3D objects with layers below.