
Operation Manual


524
USING PHOTOSHOP
3D
Last updated 12/5/2011
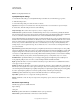
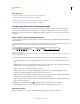
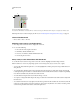
3D Axis with Mesh Rotate tool selected
A. Selected tool B. Minimize or maximize 3D Axis C. Move item along axis D. Rotate item E. Compress or elongate item F. Resize item
Note: OpenGL must be enabled to display the 3D Axis. See “Enable OpenGL and optimize GPU settings” on page 58.
Show or hide the 3D Axis
• Choose View > Show > 3D Axis.
Minimize, restore, move, or resize the 3D Axis
1 Move the pointer over the 3D Axis to display the control bar.
2 Do one of the following:
• To move the 3D Axis, drag the control bar.
• To minimize, click the minimize icon.
• To restore to normal size, click the minimized 3D Axis.
• To resize, drag the zoom icon.
Move, rotate, or scale selected items with the 3D Axis
To use the 3D Axis, move the mouse pointer over an axis control to highlight it, and then drag as follows:
Note: Available axis controls vary depending upon the current editing mode (object, camera, mesh, or light).
• To move the selected item along the X, Y, or Z-axis, highlight the conical tip of any axis. Drag in either direction
along the axis.
• To rotate the item, click the curved rotation segment just inside an axis tip. A yellow circle appears showing the
rotation plane. Drag in a clockwise or counterclockwise circle around the 3D Axis center. To rotate more gradually,
move the mouse further away from the center of the 3D Axis.
• To resize the item, drag the center cube in the 3D Axis up or down.
• To compress or elongate the item along an axis, drag one of the colored transform cubes either toward or away from
the center cube.
• To constrain movement to an object plane, move the mouse pointer into the area where two axes intersect, near the
center cube. A yellow plane icon appears between two axes. Drag in any direction. You can also move the pointer
over the lower part of the center cube to activate the plane icon.
A
B
C
D
E
F