
Operation Manual


446
USING PHOTOSHOP
Printing
Last updated 12/5/2011
• To achieve the desired scale, select Bounding Box, and drag a bounding box handle in the preview area.
Print vector data
If an image includes vector graphics, such as shapes and type, Photoshop can send the vector data to a PostScript
printer. When you choose to include vector data, Photoshop sends the printer a separate image for each type layer and
each vector shape layer. These additional images are printed on top of the base image, and clipped using their vector
outline. Consequently, the edges of vector graphics print at the printer’s full resolution, even
though the content of
each layer is limited to the resolution of your image file.
Note: Some blending modes and layer effects required rasterized vector data.
1 Choose File > Print.
2 Choose Output from the pop-up menu.
3 Select the Include Vector Data option.
4 Click Print.
Note: If you get a warning that your image is larger than the printable area of the paper, click Cancel, choose File > Print,
and select the Scale To Fit Media box. To make changes to your paper size and layout, click Print Settings, and attempt
to print the file again.
Printing with color management in Photoshop
To better understand color management concepts and workflows, see
Creative Suite
Help.
Let printer determine printed colors
If you don’t have a custom profile for your printer and paper type, you can let the printer driver handle the color
conversion. See Letting the printer determine colors when printing.
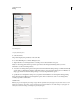
1 Choose File > Print.
2 Choose
3 Color Management
4 from the pop-up menu in the upper-right corner.