
Operation Manual


445
USING PHOTOSHOP
Printing
Last updated 12/5/2011
Note: If you get a warning that your image is larger than the printable area of the paper, click Cancel, choose File > Print,
and select the Scale To Fit Media box. To make changes to your paper size and layout, click Print Settings, and attempt
to print the file again.
Set printer options
1 In the Print dialog box, click Print Settings.
2 Set paper size, source, and page orientation as desired.
The available options depend on your printer, printer drivers, and operating system.
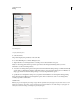
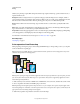
Position and scale images
You can adjust the position and scale of an image using options in the Print dialog box. The shaded border at the edge
of the paper represents the margins of the selected paper; the
printable area is white.
The base output size of an image is determined by the document size settings in the
Image Size
dialog box. Scaling an image in the Print dialog box changes the size and resolution of the printed image only. For
example, if you scale a 72-ppi image to 50% in the Print dialog box, the image will print at 144 ppi; however, the
document size settings in the
Image Size
dialog box will not change. The Print Resolution field below the Scaled Print Size area shows the print resolution at
the current scaling setting.
Many printer drivers, such as AdobePS™ and LaserWriter, provide a scaling option in the Print Settings dialog box.
This scaling affects everything on the page, including the size of all page marks, such as crop marks and captions,
whereas the scaling percentage provided by the Print command affects only the size of the printed image (and not the
size of page marks).
Note: The Print dialog box may not reflect accurate values for Scale, Height, and Width if you set a scaling percentage in
the Print Settings dialog box. To avoid inaccurate scaling, specify scaling using the Print dialog box rather than the Print
Settings dialog box; do not enter a scaling percentage in both dialog boxes.
More Help topics
“About pixel dimensions and printed image resolution” on page 63
Reposition an image on the paper
❖ Choose File > Print, and do one of the following:
• To center the image in the printable area, select Center Image.
• To position the image numerically, deselect Center Image, and then enter values for Top and Left.
• Deselect Center Image, and drag the image in the preview area.
Scale the print size of an image
❖ Choose File > Print, and do one of the following:
• To fit the image within the printable area of the selected paper, click Scale To Fit Media.
• To rescale the image numerically, deselect Scale To Fit Media, then enter values for Height and Width.