
Operation Manual

367
USING PHOTOSHOP
Filters
Last updated 12/5/2011
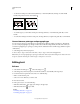
2 Select the center text box, which represents the pixel being evaluated. Enter the value by which you want to multiply
that pixel’s brightness value, from –999 to +999.
3 Select a text box representing an adjacent pixel. Enter the value by which you want the pixel in this position
multiplied.
For example, to multiply the brightness value of the pixel to the immediate right of the current pixel by 2, enter 2 in
the text box to the immediate right of the center text box.
4 Repeat steps 2 and 3 for all pixels to be included in the operation. You don’t have to enter values in all the text boxes.
5 For Scale, enter the value by which to divide the sum of the brightness values of the pixels included in the
calculation.
6 For Offset, enter the value to be added to the result of the scale calculation.
7 Click OK. The custom filter is applied to each pixel in the image, one at a time.
Use the Save and Load buttons to save and reuse custom filters.
Add Lighting Effects
Run Photoshop in 32-bit mode (64-bit Mac OS only)
In 64-bit versions of Mac OS, Lighting Effects is available only if Photoshop is running in 32-bit mode.
1 In the Finder, choose Go > Applications.
2 Expand the Photoshop folder. Then right-click the Photoshop application icon, and choose Get Info.
3 In the General section of the Info window, select Open In 32-bit Mode.
4 Close the Info window, and restart Photoshop.
For more information, see 64-bit operating system benefits and limitations in Photoshop.
Apply the Lighting Effects filter
The Lighting Effects filter lets you produce myriad lighting effects on RGB images. You can also use textures from
grayscale files (called bump maps) to produce 3D-like effects and save your own styles for use in other images.
Note: The Lighting Effects filter works only on RGB images.
1 Choose Filter > Render > Lighting Effects.
2 For Style, choose a style.
3
For Light Type, choose a type. If you’re using multiple lights, select and deselect On to turn individual lights on and off.
4 To change the color of the light, click the color box in the Light Type area of the dialog box.
The Color Picker chosen in the General Preferences dialog box opens.
5 To set light properties, drag the corresponding slider for the following options:
Gloss Determines how much the surface reflects light (as on the surface of a piece of photographic paper), from Matte
(low reflectance) to Shiny (high reflectance).
Material Determines which is more reflective: the light or the object on which the light is cast. Plastic reflects the light’s
color; Metallic reflects the object’s color.