
Operation Manual

350
USING PHOTOSHOP
Drawing
Last updated 12/5/2011
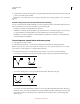
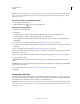
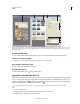
Path selected (left) and stroked (right)
Stroke a path using the current Stroke Path options
1 Select the path in the Paths panel.
2 Click the Stroke Path button at the bottom of the Paths panel. Each click of the Stroke Path button builds up
the opacity of the stroke and, depending upon the current brush options, makes it look thicker.
Stroke a path and specify options
1 Select the path in the Paths panel.
2 Select the painting or editing tool you want to stroke the path. In the options bar, set the tool options, and specify
a brush.
For information on specific tool settings, see “Smudge image areas” on page 168 and “About painting tools, options,
and panels” on page 292.
3 To stroke the path, do one of the following:
• Alt-click (Windows) or Option-click (Mac OS) the Stroke Path button at the bottom of the Paths panel.
• Alt-drag (Windows) or Option-drag (Mac OS) the path to the Stroke Path button.
• Choose Stroke Path from the Paths panel menu. If the selected path is a path component, this command changes
to Stroke Subpath.
4 In the Stroke Path dialog box, choose a tool if you did not select one in step 2. To simulate hand-painted strokes,
select Simulate Pressure. Or, deselect this option to create more linear, even strokes.
5 Click OK.
More Help topics
“Stroke a selection or layer with color” on page 322