
Operation Manual


343
USING PHOTOSHOP
Drawing
Last updated 12/5/2011
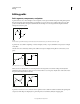
In InDesign, you can also use the Pathfinder panel to join paths. To close the path of an open path, select the path
and click Close Path in the Pathfinder panel. To close the end points between two paths, select the paths and click Join
Path. You may want to click Join Path a second time to join the second endpoint.
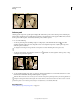
Move or nudge anchor points or segments using the keyboard
1 Select the anchor point or path segment.
Note: In Photoshop, you can move only anchor points in this manner.
2 Click or hold down any of the arrow keys on the keyboard to move 1 pixel at a time in the direction of the arrow.
Hold down the Shift key in addition to the arrow key to move 10 pixels at a time.
Note: In Illustrator and InDesign, you can change the distance of a nudge by changing the Keyboard Increment
preference. When you change the default increment, holding down Shift nudges 10 times the specified distance.
Adjust path components
You can reposition a path component (including a shape in a shape layer) anywhere within an image. You can copy
components within an image or between two Photoshop images. Using the Path Selection tool, you can merge
overlapping components into a single component. All vector objects, whether they are described by a saved path, work
path, or vector mask, can be moved, reshaped, copied, or deleted.
You can also use the Copy and Paste commands to duplicate vector objects between a Photoshop image and an image
in another application, such as Adobe Illustrator.
More Help topics
“Path segments, components, and points” on page 339
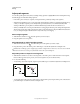
Change the overlap mode for the selected path component
1 Using the Path Selection tool , drag a marquee to select existing path areas.
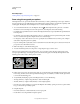
2 Choose a shape area option in the options bar:
Add To Shape Area Adds the path area to overlapping path areas.
Subtract From Shape Area Removes the path area from overlapping path areas.
Intersect Shape Areas Restricts the area to the intersection of the selected path area and overlapping path areas.
Exclude Overlapping Shape Areas Excludes the overlap area.
Show or hide the selected path component
Do one of the following:
• Choose View > Show > Target Path.
• Choose View > Extras. This command also shows or hides a grid, guides, selection edges, annotations, and slices.
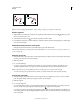
Move a path or path component
1 Select the path name in the Paths panel, and use the Path Selection tool to select the path in the image. To select
multiple path components, Shift-click each additional path component to add it to the selection.
2 Drag the path to its new location. If you move any part of a path beyond the canvas boundaries, the hidden part of
the path is still available.