
Operation Manual

318
USING PHOTOSHOP
Painting
Last updated 12/5/2011
Gradient Editor overview
To display the Gradient Editor dialog box, click the current gradient sample in the options bar. (When you hover over
the gradient sample, a tool tip reading “Click to edit gradient” appears.)
The Gradient Editor dialog box lets you define a new gradient by modifying a copy of an existing gradient. You can
also add intermediate colors to a gradient, creating a blend between more than two colors.
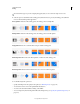
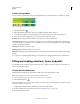
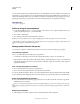
Gradient Editor dialog box
A. Panel menu B. Opacity stop C. Color stops D. Adjust values or delete the selected opacity or color stop E. Midpoint
More Help topics
“Using the options bar” on page 31
Create a smooth gradient
1 Select the Gradient tool .
2 Click inside the gradient sample in the options bar to display the Gradient Editor dialog box.
3 To base the new gradient on an existing gradient, select a gradient in the Presets section of the dialog box.
4 Choose Solid from the Gradient Type pop-up menu.
5 To define the starting color of the gradient, click the left color stop under the gradient bar. The triangle above the
stop turns black , indicating that the starting color is being edited.
6 To choose a color, do one of the following:
• Double-click the color stop, or click the color swatch in the Stops section of the dialog box. Choose a color, and
click
OK.
• Choose an option from the Color pop-up menu in the Stops section of the dialog box.
• Position the pointer over the gradient bar (the pointer turns into the eyedropper), and click to sample a color, or
click anywhere in the image to sample a color from the image.
7 To define the ending color, click the right color stop under the gradient bar. Then choose a color.
C
B
DE
A