
Operation Manual


289
USING PHOTOSHOP
Layers
Last updated 12/5/2011
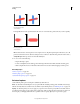
Unlinking layers and masks
By default, a layer or group is linked to its layer mask or vector mask, as indicated by the link icon between the
thumbnails in the Layers panel. The layer and its mask move together in the image when you move either one with the
Move tool
. Unlinking them lets you move them independently and shift the mask’s boundaries separately from
the layer.
• To unlink a layer from its mask, click the link icon in the Layers panel.
• To reestablish the link between a layer and its mask, click between the layer and mask path thumbnails in the Layers
panel.
Apply or delete a layer mask
You can apply a layer mask to permanently delete the hidden portions of a layer. Layer masks are stored as alpha
channels, so applying and deleting layer masks can help reduce file size. You can also delete a layer mask without
applying the changes.
1 In the Layers panel, select the layer containing the layer mask.
2 In the Masks panel, click the Pixel Mask button.
3 Do one of the following:
• To remove the layer mask after applying it permanently to the layer, click the Apply Mask icon at the bottom
of the Masks panel.
• To remove the layer mask without applying it to the layer, click the Delete button at the bottom of the Masks panel,
and then click Delete.
You can also apply or delete layer masks using the Layer menu.
Note: You cannot apply a layer mask permanently to a Smart Object layer when deleting the layer mask.
Load a layer or layer mask’s boundaries as a selection
You can select all the non-transparent areas on a layer, or, if a layer mask exists, all the unmasked areas. This is useful
when you want to select text or image content that is surrounded by or contains transparent areas, or to create a
selection that excludes masked areas on a layer.
1 Do one of the following:
• To select only the non-transparent areas on an unmasked layer, Ctrl-click (Windows) or Command-click (Mac OS)
the layer thumbnail in the Layers panel.
• To select the unmasked areas on a layer that has a layer mask, Ctrl-click (Windows) or Command-click (Mac OS)
the layer mask thumbnail in the Layers panel.
2 If a selection already exists, you can do any of the following:
• To add the pixels to an existing selection, press Ctrl+Shift (Windows) or Command+Shift (Mac OS), and click the
layer thumbnail or layer mask thumbnail in the Layers panel.
• To subtract the pixels from an existing selection, press Ctrl+Alt (Windows) or Command+Option (Mac OS), and
click the layer thumbnail or layer mask thumbnail in the Layers panel.
• To load the intersection of the pixels and an existing selection, press Ctrl+Alt+Shift (Windows) or
Command+Option+Shift (Mac
OS), and click the layer thumbnail or layer mask thumbnail in the Layers panel.
If you want to move all the contents of a layer, use the Move tool without loading a transparency mask.