
Operation Manual


253
USING PHOTOSHOP
Layers
Last updated 12/5/2011
Scene Collage Aligns layers and matches overlapping content, without changing the shape of the objects in the image
(for example, a circle will still be a circle).
Reposition Only Aligns the layers and matches overlapping content, but does not transform (stretch or skew) any of
the source layers.
Lens Correction Automatically corrects for lens defects:
• Vignette Removal Compensates for a lens defect that causes the edges, especially the corners, of an image to be
darker than the center.
• Geometric Distortion Compensates for barrel, pincushion, or fisheye distortion.
Note: Geometric Distortion will try to take into account the radical distortion to improve the result of the alignment,
except with fish eye lens; when fish eye metadata is detected, Geometric Distortion will align the images for fish eye
After auto-aligning, you can use Edit > Free Transform to fine tune the alignment or make tonal adjustments to even
out exposure differences between layers, then combine the layers into one composite image.
For a video on using Auto-Align and Auto-Blend to create a panorama and increase depth of field, see
www.adobe.com/go/lrvid4120_ps.
More Help topics
“Create panoramic images with Photomerge” on page 208
“Combine multiple images into a group portrait” on page 291
“Image Stacks (Photoshop Extended)” on page 566
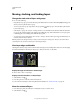
Auto blend layers
Use the Auto-Blend Layers command to stitch or combine images with smooth transitions in the final composite
image. Auto-Blend Layers applies layer masks as needed to each layer to mask out over- or underexposed areas or
content differences. Auto-Blend layers is only available for RGB or Grayscale images. It does not work with Smart
Objects, video layers, 3D layers, or background layers.
Among the many uses of the Auto-Blend Layers command, you can blend multiple images of a scene with different
areas in focus to achieve a composite image with an extended depth of field. Similarly, you can create a composite by
blending multiple images of a scene with different illuminations. In addition to combining images of a scene, you can
stitch together images into a panorama. (Although, it might be better to use the Photomerge command to produce
panoramas from multiple images.)
Auto-Blend Layers applies layer masks as needed to each layer to mask out over- or underexposed areas or content
differences and create a seamless composite.
1 Copy or place the images you want to combine into the same document.
Each image will be in a separate layer. See “Duplicate layers” on page 246.
2 Select the layers you want to blend.
3 (Optional) Align the layers.
You can align layers manually or by using the Auto-Align Layers command. See “Automatically align image layers” on
page 252.
4 With the layers still selected, choose Edit > Auto-Blend Layers.