
Operation Manual


245
USING PHOTOSHOP
Layers
Last updated 12/5/2011
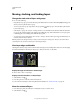
Convert background and layers
When you create a new image with a white background or a colored background, the bottommost image in the Layers
panel is called Background. An image can have only one background layer. You cannot change the stacking order
of a
background layer, its blending mode, or its opacity. However, you can convert a background into a regular layer, and
then change any of these attributes.
When you create a new image with transparent content, the image does not have a background layer. The bottommost
layer is not constrained like the background layer; you can move it anywhere in the Layers panel and change its opacity
and blending mode.
Convert a background into a layer
1 Double-click Background in the Layers panel, or choose Layer > New > Layer From Background.
2 Set layer options. (See “Create layers and groups” on page 245.)
3 Click OK.
Convert a layer into a background
1 Select a layer in the Layers panel.
2 Choose Layer > New > Background From Layer.
Any transparent pixels in the layer are converted to the background color, and the layer drops to the bottom of the
layer stack.
Note: You cannot create a background by giving a regular layer the name, Background—you must use the Background
From Layer command.
Create layers and groups
A new layer appears either above the selected layer or within the selected group in the Layers panel.
Create a new layer or group
1 Do one of the following:
• To create a new layer or group using default options, click the Create a New Layer button or New Group
button in the Layers panel.
• Choose Layer > New > Layer or choose Layer > New > Group.
• Choose New Layer or New Group from the Layers panel menu.
• Alt-click (Windows) or Option-click (Mac OS) the Create a New Layer button or New Group button in the
Layers panel to display the New Layer dialog box and set layer options.
• Ctrl-click (Windows) or Command-click (Mac OS) the Create a New Layer button or New Group button in the
Layers panel to add a layer below the currently selected layer.
2 Set layer options, and click OK:
Name Specifies a name for the layer or group.
Use Previous Layer to Create Clipping Mask This option is not available for groups. (See “Mask layers with clipping
masks” on page 290.)
Color Assigns a color to the layer or group in the Layers panel.
Mode Specifies a blending mode for the layer or group. (See “Blending modes” on page 312.)