
Operation Manual


223
USING PHOTOSHOP
Selecting and masking
Last updated 12/5/2011
Expand a selection to include areas with similar color
Do one of the following:
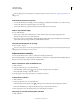
• Choose Select > Grow to include all adjacent pixels falling within the tolerance range specified in the Magic Wand
options.
• Choose Select > Similar to include pixels throughout the image, not just adjacent ones, falling within the tolerance
range.
To increase the selection in increments, choose either command more than once.
Note: You cannot use the Grow and Similar commands on Bitmap mode images or 32-bits-per-channel images.
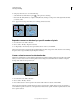
Clean up stray pixels in a color-based selection
1 Choose Select > Modify > Smooth.
2 For Sample Radius, enter a pixel value between 1 and 100, and click OK.
For each pixel in the selection, Photoshop examines the pixels around it, to the distance you specify in the radius
setting. If more than half of these surrounding pixels are selected, the pixel remains in the selection, and the unselected
pixels around it are added to the selection. If less than half the surrounding pixels are selected, the pixel is removed
from the selection. The overall effect is to reduce patchiness and smooth sharp corners and jagged lines in the selection.
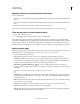
Refine selection edges
The Refine Edge option improves the quality of selection edges, letting you extract objects with ease. You can also use
Refine Edge options to refine a layer mask. (See
“Adjust mask opacity or edges” on page 286.)
1 Create a selection with any selection tool.
2 Click Refine Edge in the options bar, or choose Select > Refine Edge. Then set the following options:
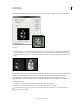
View Mode From the pop-up menu, choose a mode to change how the selection is displayed. For information
about each mode, hover the pointer over it until a tool tip appears. Show Original displays the original selection for
comparison. Show Radius displays the selection border where edge refinement occurs.
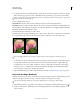
Refine Radius and Erase Refinements tools Let you precisely adjust the border area in which edge
refinement occurs. To quickly toggle from one tool to the other, press Shift+E. To change the brush size, press the
bracket keys.
Brush over soft areas such as hair or fur to add fine details to the selection.
Smart Radius Automatically adjusts the radius for hard and soft edges found in the border region. Deselect this
option if the border is uniformly hard- or soft-edged, or if you want to control the Radius setting and refinement
brushes more precisely.
Radius Determines the size of the selection border in which edge refinement occurs. Use a small radius for sharp
edges, and a large one for softer edges.
Smooth Reduces irregular areas (“hills and valleys”) in the selection border to create a smoother outline.
Feather Blurs the transition between the selection and surrounding pixels.
Contrast When increased, soft-edged transitions along the selection border become more abrupt. Typically, the
Smart Radius option and refinement tools are more effective.