
Operation Manual


216
USING PHOTOSHOP
Selecting and masking
Last updated 12/5/2011
On an image with well-defined edges, try a higher width and higher edge contrast, and trace the border roughly. On
an image with softer edges, try a lower width and lower edge contrast, and trace the border more precisely.
Stylus Pressure If you are working with a stylus tablet, select or deselect the Stylus Pressure option. When the option
is selected, an increase in stylus pressure decreases the edge width.
5 Click in the image to set the first fastening point. Fastening points anchor the selection border in place.
6 Release the mouse button or keep it depressed, and then move the pointer along the edge you want to trace.
The most recent segment of the selection border remains active. As you move the pointer, the active segment snaps to
the strongest edge in the image, based on the detection width set in the options bar. Periodically, the Magnetic Lasso
tool adds fastening points to the selection border to anchor previous segments.
7 If the border doesn’t snap to the desired edge, click once to add a fastening point manually. Continue to trace the
edge, and add fastening points as needed.
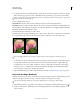
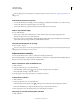
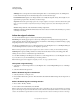
Fastening points anchor selection border to edges
8 To switch temporarily to the other lasso tools, do one of the following:
• To activate the Lasso tool, hold down Alt (Windows) or Option (Mac OS), and drag with the mouse button
depressed.
• To activate the Polygonal Lasso tool, hold down Alt (Windows) or Option (Mac OS), and click.
9 To erase recently drawn segments and fastening points, press the Delete key until you’ve erased the fastening points
for the desired segment.
10 Close the selection border:
• To close the border with a magnetic segment, double-click, or press Enter or Return. (To manually close the border,
drag over the starting point and click.)
• To close the border with a straight segment, hold down Alt (Windows) or Option (Mac OS), and double-click.
11 (Optional) Click Refine Edge to further adjust the selection boundary. See “Refine selection edges” on page 223.
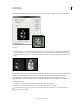
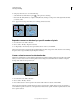
Select with the Quick Selection tool
You can use the Quick Selection tool to quickly “paint” a selection using an adjustable round brush tip. As you
drag, the selection expands outward and automatically finds and follows defined edges in the image.
1 Select the Quick Selection tool . (If the tool isn’t visible, hold down the Magic Wand tool .)
2 In the options bar, click one of the selection options: New, Add To, or Subtract From.
New is the default option if nothing is selected. After making the initial selection, the option changes automatically to
Add to.