
Operation Manual


211
USING PHOTOSHOP
Retouching and transforming
Last updated 12/5/2011
Do not include images that cover the top (zenith) or bottom (nadir) of the scene. You’ll add these images later.
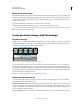
3 Select Spherical for the Layout.
If you photographed with a fisheye lens, select the Auto layout and Geometric Distortion Correction. If Photoshop
cannot automatically identify your lens, download the free Adobe Lens Profile Creator from the Adobe website.
4 (Optional) Select Vignette Removal or Geometric Distortion for the Lens Correction.
5 Click OK.
There might be transparent pixels on the edges of the panoramic image. These can prevent the final 360 panorama
from wrapping correctly. You can either crop the pixels out or use the Offset filter to identify and remove the pixels.
6 Choose 3D > New Shape From Layer > Spherical Panorama.
7 (Optional) Manually add the top and bottom images into the sphere. You could also paint out any remaining
transparent pixels in the 3D spherical panorama layer.
More Help topics
“Crop images” on page 155
“Create 3D shapes” on page 544