
Operation Manual


196
USING PHOTOSHOP
Retouching and transforming
Last updated 12/5/2011
• To copy something in perspective from one Photoshop document to another, first copy the item while in Vanishing
Point in one document. When you paste the item in another document while in Vanishing Point, the item’s
perspective is preserved.
2. Choose Filter > Vanishing Point.
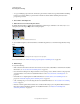
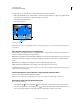
3. Define the four corner nodes of the plane surface.
By default, the Create Plane tool is selected. Click in the preview image to define the corner nodes. Try to use a
rectangle object in the image as a guide when creating the plane.
Defining the four corner nodes with the Create Plane tool
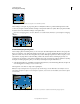
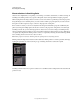
To tear off additional planes, use the Create Plane tool and Ctrl-drag (Windows) or Command-drag (Mac OS) an edge
node.
Ctrl-drag (Windows) or Command-drag (Mac OS) an edge node to tear off a plane.
For more information, see “Define and adjust perspective planes in Vanishing Point” on page 197.
4. Edit the image.
Do any of the following:
• Make a selection. Once drawn, a selection can be cloned, moved, rotated, scaled, filled, or transformed. For detailed
information, see
“About selections in Vanishing Point” on page 200.
• Paste an item from the clipboard. The pasted item becomes a floating selection, which conforms to the perspective
of any plane that it’s moved into. For detailed information, see also
“Paste an item into Vanishing Point” on
page 204.
• Paint with color or sampled pixels. For detailed information, see “Paint with a color in Vanishing Point” on
page 204 or “Paint with sampled pixels in Vanishing Point” on page 205.
• Scale, rotate, flip, flop, or move a floating selection. For detailed information, see “About selections in Vanishing
Point” on page 200.
• Measure an item in a plane. Measurements can be rendered in Photoshop by choosing Render Measurements To
Photoshop from the Vanishing Point menu. For detailed information, see
“Measure in Vanishing Point
(Photoshop Extended)” on page 206.