
Operation Manual


185
USING PHOTOSHOP
Retouching and transforming
Last updated 12/5/2011
Expansion Expands or contracts the outer edge of the mesh.
Show Mesh Deselect to show only adjustment pins, providing a clearer preview of your transformations.
To temporarily hide adjustment pins, press the H key.
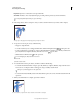
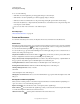
4 In the image window, click to add pins to areas you want to transform and areas you want to anchor in place.
Moving a pin on the puppet mesh. Adjoining pins keep nearby areas intact.
5 To reposition or remove pins, do any of the following:
• Drag pins to warp the mesh.
• To reveal a mesh area you’ve overlapped with another, click the Pin Depth buttons in the options bar.
• To remove selected pins, press Delete. To remove other individual pins, place the cursor directly over them, and
press Alt (Windows) or Option (Mac OS); when the scissors icon
appears, click.
• Click the Remove All Pins button in the options bar.
To select multiple pins, Shift-click them or choose
Select All
from the context menu.
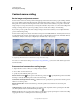
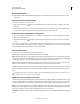
6 To rotate the mesh around a pin, select it, and then do either of the following:
• To rotate the mesh a fixed number of degrees, press Alt (Windows) or Option (Mac OS), and position the cursor
near to, but not over the pins. When a circle appears, drag to visually rotate the mesh.
The degree of rotation appears in the options bar.
• To rotate the mesh automatically based on the selected Mode option, choose Auto from the Rotate menu in the
options bar.
7 When your transformation is complete, press Enter or Return.
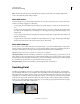
Press Alt (Windows) or Option (Mac OS) to rotate the mesh around a selected pin.