
Operation Manual

177
USING PHOTOSHOP
Retouching and transforming
Last updated 12/5/2011
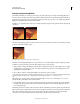
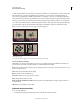
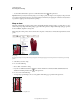
• With the duplicate channel selected, choose Filter > Stylize > Find Edges.
• Choose Image > Adjustments > Invert to invert the image.
Find Edges filter applied and image inverted
• With the inverted image still selected, choose Filter > Other > Maximum. Set the radius to a low number and
click
OK to thicken the edges and randomize the pixels.
• Choose Filter > Noise > Median. Set the radius to a low number and click OK. This averages the neighboring pixels.
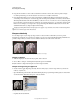
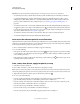
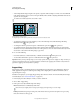
• Choose Image > Adjustment > Levels and set the black point high to get rid of random pixels. If necessary, you can
also paint with black to retouch the final edge mask.
Setting the black point high in Levels to eliminate random pixels in the edge mask
• Choose Filter > Blur > Gaussian Blur to feather the edges.
Important: The Maximum, the Median, and the
Important: Gaussian Blur
Important: filters soften the edge mask so that the sharpening effects blend better in the final image. Although all three
filters are used in this procedure, you can experiment using only one or two.
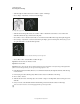
2 In the Channels panel, Ctrl-click (Windows) or Command-click (Mac OS) the duplicate channel to make the edge
mask a selection.
3 In the Layers panel, select the image layer. Make sure the selection is still visible on the image.
4 Choose Select > Inverse.
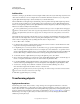
5 With the selection active on the image layer, choose Filter > Sharpen > Unsharp Mask. Set the desired options and
click
OK.
To view your results, select the RGB channel in the Channels panel and deselect the selection in the image.
You can create an action to conveniently apply all the steps in the procedure.