
Operation Manual

163
USING PHOTOSHOP
Retouching and transforming
Last updated 12/5/2011
• To rotate the sample source, enter a degree value or scrub the Rotate The Clone Source icon .
• To reset the sample source to its original size and orientation, click the Reset Transform button .
Adjust the sample source overlay options
Adjust the sample source overlay options to see the overlay and underlying images better when painting with the Clone
Stamp and Healing Brush tools.
To temporarily display the overlay while painting with the Clone Stamp tool, press Alt+Shift (Windows) or
Option+Shift (Mac OS). The brush changes temporarily to the Move Source Overlay tool. Drag to move the overlay
to another location.
❖ In the Clone Source panel, select
❖ Show Overlay
❖ and do any of the following:
• To hide the overlay while you apply the paint strokes, select Auto Hide.
• To clip overlay to the brush size, enable the Clipped option.
• To set the opacity of the overlay, enter a percentage value in the Opacity text box.
• To set the appearance of the overlay, choose either the Normal, Darken, Lighten, or Difference blending mode from
the pop-up menu at the bottom of the Clone Source panel.
• To invert the colors in the overlay, select Invert.
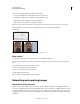
To help align identical areas in the source overlay and underlying image, set Opacity to 50%, select Invert, and deselect
Clipped. Matching image areas will appear solid gray when aligned.
Specify the clone source offset
When using the Clone Stamp tool or Healing Brush tool, you can paint with the sampled source anywhere in the target
image. The overlay options will help you visualize where you want to paint. However, if you need to paint in a very
specific location relative to the sampling point, you can specify the x and y pixel offset.
❖ In the Clone Source panel, select the source you want to use and enter the x and y pixel values for the Offset option.
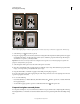
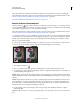
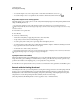
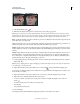
Retouch with the Healing Brush tool
The Healing Brush tool lets you correct imperfections, causing them to disappear into the surrounding image. Like the
cloning tools, you use the Healing Brush tool to paint with sampled pixels from an image or pattern. However, the
Healing Brush tool also matches the texture, lighting, transparency, and shading of the sampled pixels to the pixels
being healed. As a result, the repaired pixels blend seamlessly into the rest of the image.
(Photoshop Extended) The Healing Brush tool can be applied to video or animation frames.