
Operation Manual

157
USING PHOTOSHOP
Retouching and transforming
Last updated 12/5/2011
Steps to transform perspective
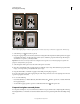
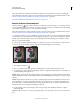
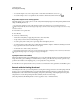
A. Draw initial cropping marquee B. Adjust cropping marquee to match the object’s edges C. Extend the cropping bounds D. Final image
1 Select the Crop tool and set the crop mode.
2 Drag the cropping marquee around an object that was rectangular in the original scene (although it doesn’t appear
rectangular in the image). You’ll use the edges of this object to define the perspective in the image. The marquee
doesn’t have to be precise—you’ll adjust it later.
Important: You must select an object that was rectangular in the original scene or Photoshop might not produce the
perspective transformation you expected.
3 Select Perspective in the options bar, and set the other options as desired.
4 Move the corner handles of the cropping marquee to match the object’s edges. This defines the perspective in the
image, so it is important to precisely match the object’s edges.
5 Drag the side handles to extend the cropping bounds while preserving the perspective.
Do not move the center point of the cropping marquee. The center point needs to be in its original position in order
to perform perspective correction.
6 Do one of the following:
• Press Enter (Windows) or Return (Mac OS), click the Commit button in the options bar, or double-click inside
the cropping marquee.
• To cancel the cropping operation, press Esc or click the Cancel button in the options bar.
Crop and straighten scanned photos
You can place several photos on your scanner and scan them in one pass, which creates a single image file. The Crop
and Straighten Photos command is an automated feature that can create separate image files from the multiple-image
scan.
A
C
D
B