
Operation Manual


151
USING PHOTOSHOP
Color and tonal adjustments
Last updated 12/5/2011
• To save the settings as the default, select Save as Defaults, and then click OK. The next time you access Levels or
Curves in the Adjustments panel, you can apply the same setting by clicking the Auto button. The Auto Tone, Auto
Contrast, and Auto Color commands also use the default clipping percentages.
Note: When you save the Auto Color Correction options as defaults for Auto Color, Auto Tone, and Auto Contrast, it
does not matter what algorithm you select in step
2. The three auto-correction commands use only those values that you
set for the target colors and clipping. The only exception is that the Auto Color command also uses the Snap Neutral
Midtones option.
Apply the Variations command
The Variations command lets you adjust the color balance, contrast, and saturation of an image by showing you
thumbnails of alternatives. This command is most useful for average-key images that don’t require precise color
adjustments.
Note: The Variations command is unavailable for indexed-color images, 16-bit images, and 64-bit versions of Mac OS.
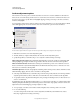
1 Choose Image > Adjustments > Variations.
The two thumbnails at the top of the dialog box show the original selection (Original) and the selection with its
currently selected adjustments (Current Pick). When you first open the dialog box, these two images are the same. As
you make adjustments, the Current Pick image changes to reflect your choices.
2 Select the Show Clipping option if you want to display a preview of areas in the image that are clipped—converted
to pure white or pure black—by the adjustment. Clipping can result in undesirable color shifts, as distinct colors in
the original image are mapped to the same color. Clipping does not occur when you adjust midtones.
3 Select what to adjust in the image:
Shadows, Midtones, or Highlights Adjusts the dark, middle, or light areas.
Saturation Changes the degree of hue in the image. If you exceed the maximum saturation for a color, it may be
clipped.
4 Drag the Fine/Coarse slider to determine the amount of each adjustment. Moving the slider one tick mark doubles
the adjustment amount.
5 Adjust the color and brightness:
• To add a color to the image, click the appropriate color thumbnail.
• To subtract a color, click the thumbnail for its opposite color. For example, to subtract cyan, click the More Red
thumbnail. See
“Understanding color” on page 87.
• To adjust brightness, click a thumbnail on the right side of the dialog box.
The effects of clicking the thumbnails are cumulative. For example, clicking the More Red thumbnail twice applies the
adjustment twice. Each time you click a thumbnail, the other thumbnails change. The three Current Pick thumbnails
always reflect the current choices.
You can also save the settings you make in the Variations dialog box for reuse on other images. For more information
on saving and loading settings, see
“Save adjustment settings” on page 119 and “Reapply adjustment settings” on
page 120.