
Operation Manual


149
USING PHOTOSHOP
Color and tonal adjustments
Last updated 12/5/2011
By default, when identifying the lightest and darkest pixels in an image, Auto Contrast clips the white and black pixels
by 0.5%—that is, it ignores the first 0.5% of either extreme. You can change this default using the Auto Color
Correction Options found in the Levels and the Curves dialog boxes.
Auto Contrast can improve the appearance of many photographic or continuous-tone images. It does not improve
flat-color images.
1 Do one of the following:
• Click the Levels or Curves icon in the Adjustments panel.
• Choose Layer > New Adjustment Layer and choose either Levels or Curves. Click OK in the New Layer dialog box.
Note: You can also choose Image > Auto Contrast to apply the adjustment directly to the image layer. Keep in mind that
this method discards image information and its application is automatic. You cannot adjust any of the options in the
following steps.
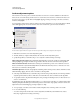
2 In the Adjustments panel, Alt-click (Windows) or Option-click (Mac OS) the Auto button.
3 Under Algorithms in the Auto Color Correction Options dialog box, select the Enhance Monochromatic Contrast
option.
4 Specify the shadows and highlights that are clipped, and adjust the target color for the midtones.
5 Click OK to apply Auto Contrast.
More Help topics
“Set Auto adjustment options” on page 150
Remove a color cast using Auto Color
Auto Color adjusts the contrast and color of an image by searching the image to identify shadows, midtones, and
highlights. By default, Auto Color neutralizes the midtones using a target color of RGB 128 gray and clips the shadows
and highlight pixels by 0.5%. You can change these defaults in the Auto Color Correction Options dialog box.
1 Do one of the following:
• Click the Levels or Curves icon in the Adjustments panel.
• Choose Layer > New Adjustment Layer and choose either Levels or Curves. Click OK in the New Layer dialog box.
Note: You can also choose Image > Auto Color to apply the adjustment directly to the image layer. Keep in mind that this
method discards image information and is automatic. You cannot adjust any of the options in the following steps.
2 In the Adjustments panel, Alt-click (Windows) or Option-click (Mac OS) the Auto button.
3 Under Algorithms in the Auto Color Correction Options dialog box, select the Find Dark & Light colors option.
4 Select the Snap Neutral Midtones option.
5 Specify the shadows and highlights that are clipped, and adjust the target color for the midtones.
6 Click OK to apply Auto Color.
More Help topics
“Adjust color using Levels” on page 123
“Set Auto adjustment options” on page 150