
Operation Manual


146
USING PHOTOSHOP
Color and tonal adjustments
Last updated 12/5/2011
Note: You can also choose Image > Adjustments > Selective Color. But keep in mind that this method makes direct
adjustments to the image layer and discards image information.
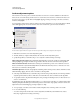
3 In the Adjustments panel, choose the color you want to adjust from the Colors menu.
4 Choose a method from the Adjustments panel menu:
Relative Changes the existing amount of cyan, magenta, yellow, or black by its percentage of the total. For example, if
you start with a pixel that is 50% magenta and add 10%, 5% is added to the magenta (10% of 50% = 5%) for a total of
55% magenta. (This option cannot adjust pure specular white, which contains no color components.)
Absolute Adjusts the color in absolute values. For example, if you start with a pixel that is 50% magenta and add 10%,
the magenta ink is set to a total of 60%.
Note: The adjustment is based on how close a color is to one of the options in the Colors menu. For example, 50% magenta
is midway between white and pure magenta and receives a proportionate mix of corrections defined for the two colors.
5 Drag the sliders to increase or decrease the components in the selected color.
You can also save the settings you make for the Selective Color adjustment and reuse the settings on other images.
More Help topics
“Save adjustment settings” on page 119
“Reapply adjustment settings” on page 120
Making quick tonal adjustments
Change the color balance using the Photo Filter command
The Photo Filter adjustment mimics the technique of placing a colored filter in front of the camera lens to adjust the
color balance and color temperature of the light transmitted through the lens and exposing the film. Photo Filter also
lets you choose a color preset to apply a hue adjustment to an image. If you want to apply a custom color adjustment,
the Photo Filter adjustment lets you specify a color using the Adobe Color Picker.
1 Do one of the following:
• Click the Photo Filter icon in the Adjustments panel.
• Choose Layer > New Adjustment Layer > Photo Filter. Click OK in the New Layer dialog box.
Note: You can also choose Image > Adjustments > Photo Filter. But keep in mind that this method makes direct
adjustments to the image layer and discards image information.
2 In the Adjustments panel, choose the filter color, either a custom filter or a preset. For a custom filter, select the
Color option, click the color square, and use the Adobe Color Picker to specify a color for a custom color filter. For
a preset filter, select the Filter option and choose one of the following presets from the Filter menu:
Warming Filter (85 and LBA) and Cooling Filter (80 and LBB) Color conversion filters that tune the white balance in an
image. If an image was photographed with a lower color temperature of light (yellowish), the Cooling Filter (80) makes
the image colors bluer to compensate for the lower color temperature of the ambient light. Conversely, if the photo
was taken with a higher color temperature of light (bluish), the Warming Filter (85) makes the image colors warmer
to compensate for the higher color temperature of the ambient light.