
Operation Manual


145
USING PHOTOSHOP
Color and tonal adjustments
Last updated 12/5/2011
Note: You can also choose Image > Adjustments > Channel Mixer. But keep in mind that this method makes direct
adjustments to the image layer and discards image information.
3 To control the amount of detail and contrast in the images before you convert them to grayscale, use the source
channel sliders.
Before adjusting the percentages of the source channels, view how each source channel affects the monochrome image.
For example, in RGB, view the image with the Red channel set to +100% and the Green and Blue source channels set
to 0%. Then, view the image with the Green source channel set to +100% and the other two channels set to 0%. Finally,
view the image with Blue source channel set to +100% and the other channels set to 0%.
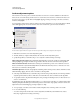
The Total value displays the total percentage of the source channels. For best results, adjust the source channels so the
combined values equal 100%. If the combined values are above 100%, a warning icon appears next to the total,
indicating that the processed image will be brighter than the original, possibly removing highlight detail.
4 (Optional) Drag the slider or enter a value for the Constant option.
This option adjusts the grayscale value of the output channel. Negative values add more black, and positive values add
more white. A -200% value makes the output channel black; a +200% value makes the output channel white.
Create a hand-tinted appearance for specific image elements
1 In the Channels panel, select the composite color channel.
2 In the Adjustments panel, click the Channel Mixer icon .
3 Select and then deselect Monochrome.
4 Choose an Output Channel option, and adjust the source channel sliders. (Repeat this step as desired for each
output channel.)
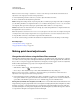
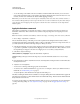
A. Original color image B. Selecting Monochrome creates grayscale image C. Deselecting Monochrome and mixing channels tints elements of
grayscale image
Make selective color adjustments
Selective color correction is a technique used by high-end scanners and separation programs to change the amount of
process colors in each of the primary color components in an image. You can modify the amount of a process color in
any primary color selectively—without affecting the other primary colors. For example, you can use selective color
correction to dramatically decrease the cyan in the green component of an image while leaving the cyan in the blue
component unaltered.
Even though Selective Color uses CMYK colors to correct an image, you can use it on RGB images.
1 Make sure that the composite channel is selected in the Channels panel. The Selective Color adjustment is available
only when you’re viewing the composite channel.
2 Do one of the following:
• Click the Selective Color icon or a Selective Color preset in the Adjustments panel.
• Choose Layer > New Adjustment Layer > Selective Color. Click OK in the New Layer dialog box.
A B
C