
Operation Manual

143
USING PHOTOSHOP
Color and tonal adjustments
Last updated 12/5/2011
Use the Color Replacement tool
The Color Replacement tool paints over a targeted color with a replacement color. While this tool is good for quick
edits, it often proves unsatisfactory, particularly with dark colors and black. If you don’t get good results after
experimenting with tool options, see
“Apply a Hue/Saturation adjustment to selected objects” on page 141.
The Color Replacement tool doesn’t work in Bitmap, Indexed, or Multichannel color mode.
1 Select the Color Replacement tool . (If the tool isn’t visible, access it by holding down the Brush tool.)
2 In the options bar, choose a brush tip. Generally, you should keep the blending mode set to Color.
3 For the Sampling option, choose one of the following:
Continuous Samples colors continuously as you drag.
Once Replaces the targeted color only in areas containing the color that you first click
Background Swatch Replaces only areas containing the current background color.
4 From the Limits menu, select one of the following:
Discontiguous Replaces the sampled color wherever it occurs under the pointer.
Contiguous Replaces colors that are contiguous with the color immediately under the pointer
Find Edges Replaces connected areas containing the sampled color while better preserving the sharpness of
shape
edges.
5 For Tolerance, choose a low percentage to replace colors very similar to the pixel you click, or raise the percentage
to replace a broader range of colors.
6 To produce a smooth edge in the corrected areas, select Anti-aliased.
7 Choose a foreground color to replace the unwanted color. (See “Choose colors in the toolbox” on page 99.)
8 Click the color you want to replace in the image.
9 Drag in the image to replace the targeted color.
If the range of replaced colors is too small, increase the Tolerance setting in the options bar.
More Help topics
“Blending mode examples” on page 314
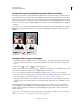
Mix color channels
Using the Channel Mixer adjustment, you can create high-quality grayscale, sepia tone, or other tinted images. You
can also make creative color adjustments to an image. To create high-quality grayscale images, choose the percentage
for each color channel in the Channel Mixer adjustment. To convert a color image to grayscale and add tinting to the
image, use the Black & White command (see
“Convert a color image to black and white” on page 132).
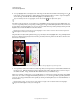
The Channel Mixer adjustment options modify a targeted (output) color channel using a mix of the existing (source)
color channels in the image. Color channels are grayscale images representing the tonal values of the color components
in an image (RGB or CMYK). When you use the Channel Mixer, you are adding or subtracting grayscale data from a
source channel to the targeted channel. You are not adding or subtracting colors to a specific color component as you
do with the Selective Color adjustment.
Channel Mixer presets are available from the Preset menu in the Adjustments panel. Use the default Channel Mixer
presets to create, save, and load custom presets.