
Operation Manual

142
USING PHOTOSHOP
Color and tonal adjustments
Last updated 12/5/2011
The selection becomes a mask on the adjustment layer.
3 In the Adjustments panel, change Hue and Saturation settings to replace the object’s color. If original color tints
the new color, select Colorize, and readjust settings. (See
“Adjust hue and saturation” on page 129.)
Leave the Lightness setting at zero to maintain contrast. To maintain both contrast and saturation, select the Hue
blending mode for the adjustment layer.
4 If necessary, enlarge or reduce the affected area by painting on the mask with white or black. (See “Edit a layer
mask” on page 285.)
For more information, see “Adjustments panel overview” on page 116.
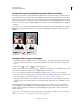
Use the Replace Color dialog box
The Replace Color dialog box combines tools for selecting a color range with HSL sliders for replacing that color. You
can also choose the replacement color in the Color Picker.
Replace Color lacks the Colorize option from the Hue/Saturation adjustment, which may be needed for a complete
color change. You may also find the adjustment layer technique easier for changing specific objects. However, the
Replace Color command is good for global color changes—especially changing out-of-gamut colors for printing.
1 Choose Image > Adjustments > Replace Color.
2 (Optional) If you are selecting similar, contiguuous colors in the image, select Localized Color Clusters to build a
more accurate mask.
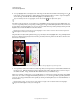
3 Select a preview option:
Selection Displays the mask in the preview box. Masked areas are black, and unmasked areas are white. Partially
masked areas (areas covered with a semitransparent mask) appear as varying levels of gray according to their opacity.
Image Displays the image in the preview box. This option is useful when you are working with a magnified image or
have limited screen space.
4 To select the colors that you want to replace, use the Eyedropper tool to click in the image or in the preview box
to select the areas exposed by the mask.
5 To refine the selection, do any of the following:
• Shift-click or use the Add To Sample Eyedropper tool to add areas.
• Alt-click (Windows), Option-click (Mac OS), or use the Subtract From Sample Eyedropper tool to remove
areas.
• Click the Selection Color swatch to open the Color Picker. Use the Color Picker to target the color you want
replaced. As you select a color in the Color Picker, the mask in the preview box is updated.
6 Drag the Fuzziness slider or enter a Fuzziness value to control the degree to which related colors are included in the
selection.
7 Specify a Replacement color by doing either of the following:
• Drag the Hue, Saturation, and Lightness sliders (or enter values in the text boxes).
• Double-click the Result swatch and use the Color Picker to select the replacement color.
Important: You cannot replace pure gray, black, or white with a color. However, you can change the Lightness setting.
(The Hue and Saturation settings are relative to existing color, so they have no effect.)
8 (Optional) Click Save to store settings you will later load for other images.
For a video on dodging and burning with the Replace Color command, see www.adobe.com/go/lrvid4119_ps.
(Discussion of Replace Color begins at the 5:30 mark.)