
Operation Manual

141
USING PHOTOSHOP
Color and tonal adjustments
Last updated 12/5/2011
Remove a color cast with Match Color
The Match Color command can adjust the brightness, color saturation, and color balance in an image. The advanced
algorithms in the Match Color command give you better control over luminance and color components of the image.
Because you are adjusting the color in a single image rather than matching the colors between two images, the image
you’re correcting is both the source and the target image.
1 Choose Image > Adjustments > Match Color.
2 In the Image Statistics area, make sure that None is chosen in the Source menu. The option specifies that the source
and the target are the same image.
3 To automatically remove a color cast, select the Neutralize option. Make sure that the Preview option is selected so
that your image is updated as you make adjustments.
4 To increase or decrease the brightness in the image, adjust the Luminance slider. Moving the Luminance slider to
the left darkens the image, and moving the slider to the right brightens the image. The luminance control tries not
to clip pixels (change them to pure black/no detail or pure white/no detail) in either the shadows or highlights.
However, it may clip pixels because an image can have only either 8-bit or 16-bit values.
5 To increase or decrease the saturation of colors in the image, adjust the Color Intensity slider. Moving the Color
Intensity slider to the left reduces the color saturation, and the image becomes monochromatic. Moving the Color
Intensity to the right increases saturation and intensifies the colors.
6 To control the amount of adjustment applied to the image, adjust the Fade slider. Moving the slider to the right
reduces the amount of adjustment.
Note: You can use the Match Color controls separately to apply a single correction to the image. For example, you can
adjust only the Luminance slider to brighten/darken an image without affecting the color. Or you can use the controls in
different combinations, depending on the color correction you’re making.
7 Click OK.
Save and apply settings in the Match Color command
• In the Image Statistics area of the Match Color dialog box, click the Save Statistics button. Name and save the
settings.
• In the Image Statistics area of the Match Color dialog box, click the Load Statistics button. Locate and load the saved
settings file.
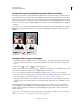
Replace the color of objects in an image
Photoshop provides several techniques that let you replace the colors of objects. For great flexibility and results, apply
a Hue/Saturation adjustment to selected objects. For less flexibility but a convenient grouping of options, use the
Replace Color dialog box. For speed but less precision, try the Color Replacement tool.
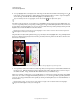
Apply a Hue/Saturation adjustment to selected objects
In most cases, this flexible technique best replaces colors. Because masks and adjustment layers are non-destructive,
you can later fine-tune the results with complete freedom. A unique Colorize option makes absolute, rather than
relative, color changes (avoiding tinting from original colors).
1 Select the object you want to change. The Quick Selection tool often produces good results. For additional
techniques, see “Select a color range” on page 218 and “Refine selection edges” on page 223.
2 Click the New Adjustment Layer button at the bottom of the Layers panel, and choose Hue/Saturation from
the pop-up menu.