
Operation Manual

139
USING PHOTOSHOP
Color and tonal adjustments
Last updated 12/5/2011
Matching, replacing, and mixing colors
Match the color in different images
The Match Color command matches colors between multiple images, between multiple layers, or between multiple
selections. It also lets you adjust the colors in an image by changing the luminance, changing the color range, and
neutralizing a color cast. The Match Color command works only in RGB mode.
When you use the Match Color command, the pointer becomes the Eyedropper tool. Use the Eyedropper tool while
adjusting the image to view the color pixel values in the Info panel. This panel gives you feedback about changes in
color values as you use the Match Color command. See
“View color values in an image” on page 113.
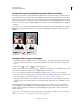
The Match Color command matches the colors in one image (the source image) with colors in another image (the
target image). Match Color is useful when you’re trying to make the colors in different photos consistent, or when
certain colors (such as skin tones) in one image must match the colors in another image.
In addition to matching the color between two images, the Match Color command can match the color between
different layers in the same image.
Match the color between two images
1 (Optional) Make a selection in the source and target images.
If you don’t make a selection, then the Match Color command matches the overall image statistics between images.
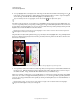
2 Make the image that you want to change active, and then choose Image > Adjustments > Match Color.
If you’re applying the Match Color command to a specific layer in the target image, make sure that layer is active when
you choose the Match Color command.
3 From the Source menu in the Image Statistics area of the Match Color dialog box, choose the source image whose
colors you’ll be matching in the target image. Choose None when you don’t want to reference a different image to
calculate the color adjustment. With None chosen, the target image and the source image are the same.
If necessary, use the Layer menu to choose the layer from the source image whose colors you want to match. You can
also choose Merged from the Layer menu to match the colors from all the layers in the source image.
4 If you made a selection in the image, do one or more of the following:
• In the Destination Image area, select Ignore Selection When Applying Adjustment if you’re applying the
adjustment to the entire target image. This option ignores the selection in the target image and applies the
adjustment to the entire target image.
• In the Image Statistics area, select Use Selection In Source To Calculate Colors if you made a selection in the source
image and want to use the colors in the selection to compute the adjustment. Deselect this option to ignore the
selection in the source image, and use the colors from the entire source image to compute the adjustment.
• In the Image Statistics area, select Use Selection In Target To Calculate Adjustment if you made a selection in the
target image and want to use the colors in the selection to calculate the adjustment. Deselect this option to ignore
the selection in the target image and compute the adjustment by using the colors of the entire target image.
5 To automatically remove a color cast in the target image, select the Neutralize option. Make sure that the Preview
option is selected so that your image is updated as you make adjustments.
6 To increase or decrease the brightness in the target image, move the Luminance slider. Alternatively, enter a value
in the Luminance box. The maximum value is 200, the minimum is 1, and the default is 100.