
Operation Manual

137
USING PHOTOSHOP
Color and tonal adjustments
Last updated 12/5/2011
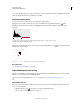
Using Levels to preserve highlight and shadow details for printing
The Output Levels sliders let you set the shadow and highlight levels to compress the image into a range less than 0 to
255. Use this adjustment to preserve the shadow and highlight details when an image is being printed on a press whose
characteristics you know. For example, suppose there are important image details in the highlights with a value of 245,
and the printing press that you’re using won’t hold a dot smaller than 5%. You can pull the highlight slider to level 242
(which is a 5% dot on the press) to shift the highlight detail from 245 to 242. Now, the highlight detail can safely print
on that press.
Generally, it is not a good idea to use the Output Levels sliders to target images with specular highlights. Your specular
highlight will look gray rather than blow out to pure white. Use the highlight eyedropper for images with specular
highlights.
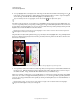
Targeting shadows and highlights with Output Levels sliders
Set target values using the eyedroppers
1 Select the Eyedropper tool in the toolbox. You can choose 3 by 3 Average from the Sample Size menu in the
Eyedropper tool options. This ensures a representative sample of an area rather than the value of a single screen
pixel.
2 Click the Levels or Curves icon in the Adjustments panel.
When you select Levels or Curves, the Eyedropper tool is active outside the dialog box. You still have access to the
scroll controls, the Hand tool, and the Zoom tool through keyboard shortcuts.
3 Do one of the following to identify areas of highlights and shadows that you want to preserve in the image:
• Move the pointer around the image, and look at the Info panel to find the lightest and darkest areas that you want
preserved (not clipped to pure black or white). (See
“View color values in an image” on page 113.)
• Drag the pointer in the image, and look at Curves in the Adjustments panel box to find the lightest and darkest
points you want to preserve. This method does not work if the Curves adjustment is set to the CMYK composite
channel.
When identifying the lightest highlight details that you want targeted to a printable (lower) value, don’t include
specular highlights. Specular highlights such as the highlight glint in jewelry or a spot of glare are meant to be the
brightest points in an image. It’s desirable to clip specular highlight pixels (pure white, no detail) so that no ink is
printed on the paper.
You can also use the Threshold command to identify representative highlights and shadows before accessing Levels or
Curves. (See “Create a two-valued black and white image” on page 153.)