
Operation Manual

135
USING PHOTOSHOP
Color and tonal adjustments
Last updated 12/5/2011
not to make the clipping values too large, because doing so reduces detail in the shadows or highlights (the intensity
values are clipped and rendered as pure black or pure white).
Add contrast to a photo
You can add contrast to an image in two ways, depending on the problem.
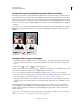
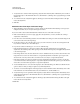
If the image needs overall contrast because it doesn’t use the full tonal range, click the Levels icon in the
Adjustments panel. Then drag the Shadow and Highlight input sliders inward until they touch the ends of the
histogram.
image layer don’t extend to the ends of the graph, indicating that the image is not using the full tonal range.
A. Shadow Input slider B. Highlight Input slider
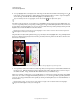
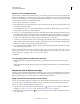
If the image uses the full tonal range, but needs midtone contrast, Click the Curves icon in the Adjustments panel.
Drag the curve into an S shape.
Increasing the slope in the middle of the curve increases contrast in the midtones.
More Help topics
“About adjustment and fill layers” on page 271
Adjust HDR exposure and toning
The Exposure and HDR Toning adjustments are primarily designed for 32-bit HDR images, but you can also apply
them to 16- and 8-bit images to create HDR-like effects.
For a video about applying HDR effects to16- or 8-bit images, see www.adobe.com/go/lrvid5011_ps_en
Adjust HDR exposure
Exposure works by performing calculations in a linear color space (gamma 1.0) rather than the current color space.
1 Do one of the following:
• Click the Exposure icon or an Exposure preset in the Adjustments panel.
• Choose Layer > New Adjustment Layer > Exposure.
A B