
Operation Manual

130
USING PHOTOSHOP
Color and tonal adjustments
Last updated 12/5/2011
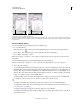
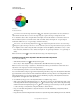
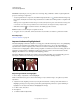
Color wheel
A. Saturation B. Hue
You can also select the On-image adjustment tool in the Adjustments panel and then Ctrl-click (Windows) or
Command-click (Mac OS) on a color in the image. Drag left or right in the image to modify the hue value.
4 For Saturation, enter a value or drag the slider to the right to increase the saturation or to the left to decrease it.
The color shifts away from or toward the center of the color wheel. Values can range from -100 (percentage of
desaturation, duller colors) to +100 (percentage of saturation increase).
You can also , select the On-image adjustment tool in the Adjustments panel and click on a color in the image.
Drag left or right in the image to decrease or increase saturation of the color range that includes the pixel you clicked.
5 For Lightness, enter a value or drag the slider to the right to increase the lightness (add white to a color) or to the
left to decrease it (add black to a color). Values can range from -100 (percentage of black) to +100 (percentage of
white).
Note: Click the Reset button to undo a Hue/Saturation setting in the Adjustments panel.
Specify the range of colors adjusted in the Hue/Saturation adjustment
1 Do one of the following:
• Click the Hue/Saturation icon in the Adjustments panel.
• Choose Layer > New Adjustment Layer > Hue/Saturation. Click OK in the New Layer dialog box.
Note: You can also choose Image > Adjustments > Hue/Saturation. But keep in mind that this method makes direct
adjustments to the image layer and discards image information.
2 In the Adjustments panel, choose a color from the menu just above the sliders.
Four color wheel values (in degrees) appear in the Adjustments panel. They correspond to the adjustment sliders that
appear between the color bars. The two inner vertical sliders define the color range. The two outer triangle sliders show
where the adjustments on a color range “fall off” (fall-off is a feathering or tapering of the adjustments instead of a
sharply defined on/off application of the adjustments).
3 Use either the eyedropper tools or the adjustment sliders to modify the range of colors.
• Click or drag in the image with the Eyedropper tool to select a color range. To expand the range, click or drag
in the image with the Add To Sample Eyedropper tool . To reduce the range of color, click or drag in the image
with the Subtract From Sample Eyedropper tool . While an eyedropper tool is selected, you can also press Shift
to add to the range, or Alt (Windows) or Option (Mac OS) to subtract from it.
• Drag one of the white triangle sliders to adjust the amount of color fall-off (feathering of adjustment) without
affecting the range.
• Drag the area between the triangle and the vertical bar to adjust the range without affecting the amount of fall-off.
0/360
180
90270
A
B