
Operation Manual

123
USING PHOTOSHOP
Color and tonal adjustments
Last updated 12/5/2011
Adjusting black and white points with Levels Input sliders
5 (Optional) To identify areas in the image that are being clipped (completely black or completely white), do one of
the following:
• Hold down Alt (Windows) or Option (Mac OS) as you drag the black point and white point sliders.
• Choose Show Clipping For Black/White Points from the panel menu.
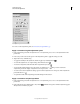
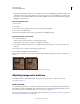
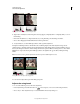
6 To adjust midtones, use the middle Input slider to make a gamma adjustment.
Moving the middle Input slider to the left makes the overall image lighter. This slider adjustment maps a lower
(darker) level up to the midpoint level between the Output sliders. If the Output sliders are in their default position (0
and 255), the midpoint is level 128. In this example, the shadows expand to fill the tonal range from 0 to 128, and the
highlights are compressed. Moving the middle Input slider to the right has the opposite effect, making the image
darker.
Note: You can also enter a gamma adjustment value directly in the middle Input Levels box.
Moving the middle slider adjusts the image gamma
You can view the adjusted histogram in the Histogram panel.
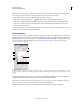
Adjust color using Levels
1 Do one of the following to access the Levels adjustment:
• In the Adjustments panel, click the Levels icon or a Levels preset, or choose Levels from the panel menu.
• Choose Layer > New Adjustment Layer > Levels. Click OK in the New Layer dialog box.