
Operation Manual

121
USING PHOTOSHOP
Color and tonal adjustments
Last updated 12/5/2011
Photoshop automatically brings all colors into gamut when you convert an RGB image to CMYK. Note that some
detail in the image may be lost, depending on your conversion options. You can identify the out-of-gamut colors
in an image or correct them manually before converting to CMYK. You can use the Gamut Warning command to
highlight out-of-gamut colors.
Find out-of-gamut colors
1 Choose View >
2 Proof Setup
3 , then choose the proof profile on which you want to base the gamut warning.
4 Choose View > Gamut Warning.
All pixels outside the gamut of the current proof profile space are highlighted in gray.
Change the gamut warning color
1 Do one of the following:
• (Windows) Choose Edit > Preferences > Transparency & Gamut.
• (Mac OS) Choose Photoshop > Preferences > Transparency & Gamut.
2 Under Gamut Warning, click the color box to display the Color Picker. Then choose a new warning color, and
click
OK.
For best results, use a color that is not already present in the image.
3 Enter a value in the Opacity box, then click OK.
Use this option to reveal more or less of the underlying image through the warning color. Values can range from 1 %
to 100%.
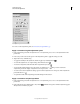
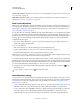
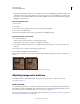
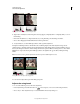
Original image, and out-of-gamut colors preview with blue selected for gamut warning color
Adjusting image color and tone
For detailed instructions, click the links below. To ask questions, request features, or report problems, visit
feedback.photoshop.com.
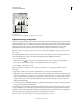
Levels overview
You use the Levels adjustment to correct the tonal range and color balance of an image by adjusting intensity levels of
image shadows, midtones, and highlights. The Levels histogram is a visual guide for adjusting the image key tones. For
more information on how to read a histogram, see
“About histograms” on page 109.
You can save Levels settings as a preset, then apply them to other images. See “Save adjustment settings” on page 119
and “Reapply adjustment settings” on page 120.