
Operation Manual


99
USING PHOTOSHOP
Color fundamentals
Last updated 12/5/2011
Choose colors in the toolbox
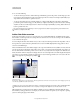
The current foreground color appears in the upper color selection box in the toolbox; the current background color
appears in the lower box.
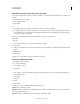
Foreground and background color boxes in toolbox
A. Default Colors icon B. Switch Colors icon C. Foreground color box D. Background color box
• To change the foreground color, click the upper color selection box in the toolbox, and then choose a color in the
Adobe Color Picker.
• To change the background color, click the lower color selection box in the toolbox, and then choose a color in the
Adobe Color Picker.
• To reverse the foreground and background colors, click the Switch Colors icon in the toolbox.
• To restore the default foreground and background colors, click the Default Colors icon in the toolbox.
More Help topics
“About the HDR Color Picker” on page 83
Choose colors with the Eyedropper tool
The Eyedropper tool samples color to designate a new foreground or background color. You can sample from the
active image or from anywhere else on the screen.
1 Select the Eyedropper tool .
2 In the options bar, change the sample size of the eyedropper by choosing an option from the Sample Size menu:
Point Sample Reads the precise value of the pixel you click.
3 by 3 Average, 5 by 5 Average, 11 by 11 Average, 31 by 31 Average, 51 by 51 Average, 101 by 101 Average Reads the
average value of the specified number of pixels within the area you click.
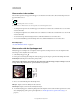
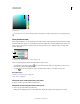
Selecting a foreground color with the Eyedropper tool
A. Point sample B. 5 x 5 average sample
3 Choose one of the following from the Sample menu:
All Layers Samples color from all layers in the document.
Current Layer Samples color from the currently active layer.
4 To circle the Eyedropper tool with a ring that previews the sampled color above the current foreground color, select
Show Sampling Ring. (This option requires OpenGL. See
“Enable OpenGL and optimize GPU settings” on
page 58.)
A
C
B
D
A
B