
Operation Manual


359
USING PHOTOSHOP CS4
Painting
Last updated 1/10/2010
Filling and stroking selections, layers, and paths
You can fill the inside of a selection, path, or layer with a color or pattern. You can also add color to the outline of a
selection or path, called stroking.
Fill with the Paint Bucket tool
The Paint Bucket tool fills adjacent pixels that are similar in color value to the pixels you click.
Note: The Paint Bucket tool cannot be used with images in Bitmap mode.
1 Choose a foreground color. (See “Choose colors in the toolbox” on page 118.)
2 Select the Paint Bucket tool .
3 Specify whether to fill the selection with the foreground color or with a pattern.
4 Specify a blending mode and opacity for the paint. (See “List of blending modes” on page 351.)
5 Enter the tolerance for the fill.
The tolerance defines how similar in color a pixel must be (to the pixel you click) to be filled. Values can range from 0
to 255. A low tolerance fills pixels within a range of color values very similar to the pixel you click. A high tolerance
fills pixels within a broader range.
6 To smooth the edges of the filled selection, select Anti-aliased.
7 To fill only pixels contiguous to the one you click, select Contiguous; leave Contiguous unselected to fill all similar
pixels in the image.
8 To fill pixels based on the merged color data from all visible layers, select All Layers.
9 Click the part of the image you want to fill. All specified pixels within the specified tolerance are filled with the
foreground color or pattern.
If you’re working on a layer and don’t want to fill transparent areas, make sure that the layer’s transparency is locked
in the Layers panel. (See
“Lock layers” on page 294.)
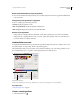
Fill a selection or layer with a color
1 Choose a foreground or background color. (See “Choose colors in the toolbox” on page 118.)
2 Select the area you want to fill. To fill an entire layer, select the layer in the Layers panel.
3 Choose Edit > Fill to fill the selection or layer. Or to fill a path, select the path, and choose Fill Path from the Paths
panel menu.
4 In the Fill dialog box, choose one of the following options for Use, or select a custom pattern:
Foreground Color, Background Color, Black, 50% Gray, or White Fills the selection with the specified color.
Color Fills with a color you select from the Color Picker.
Pattern Fills the selection with a pattern. Click the inverted arrow next to the pattern sample, and select a pattern from
the pop-up panel. You can load additional patterns using the pop-up panel menu. Select the name of a library of
patterns, or choose Load Patterns and navigate to the folder containing the patterns you want to use.
History Restores the selected area to a state or snapshot of the image set as the source in the History panel.
Note: If you fill a CMYK image using the Black option, Photoshop fills all the channels with 100% black. This may result
in more ink than is allowable by the printer. For best results when filling a CMYK image, use the Foreground option with
the foreground color set to an appropriate black.