
Operation Manual

195
Typography
Last updated 6/15/2014
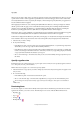
Enlarge/Shrink from Center of Character Set whether to scale from the center of the character or the roman baseline,
when editing vertical and horizontal scales for kana. If you select this option, the characters will be scaled from the
center.
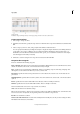
Make custom font settings in a composite font
You can set the font in character units by setting Custom for composite fonts.
1 Click Custom in the Composite Font Editor dialog box.
2 Do one of the following:
• If there is an existing character set, select it.
• Click the New button, enter a name for the character set, choose Custom Set From Based On, and click OK. The
following base sets are provided: Hiragana, Katakana, Punctuation, Symbols, Double Byte Numbers, Single Byte
Numbers, Single-Byte Gaiji 0-11. Using these, you can easily create character sets to meet your requirements. If
Based On is not needed, choose None and click OK.
If you have selected a base set, the characters stored in the selected set will be shown in the Custom Set Edit dialog
box. If None is selected, no characters will be displayed.
3 Use Font to specify the font to use with the Custom Set. If Single Byte Gaiji is specified as the base set, choose the
single byte Gaiji you would like to use.
4 To add a glyph directly, choose Direct Entry from the pop-up menu, enter the characters in the text box, and click
Add. You can also copy and paste characters directly into the dialog box from the IME panel.
5 To enter a code, specify the encoding type (such as Shift-JIS for Japanese) from the pop-up menu, enter the code or
hyphenated code range (such as 8169-8174 for Japanese), and click Add.
6 Select characters you want to delete. The Add button becomes a Delete button; the selected characters will be deleted
when you click Delete.
7 If multiple custom sets have been created, choose the edited character set from the Custom Set pop-up menu. You
can delete sets that are no longer needed by clicking Delete on the right side of the dialog box.
8 When you have completed editing, click Save to save the character and then click OK.
9 The custom set that was set in the Composite Font Edit dialog box will be displayed, allowing you to set the
composite font.
Note: When there are several custom characters in 1 composite font, the bottom set takes precedence over all the above sets.
MM (multiple master) fonts are not displayed in the Composite Font Edit dialog box.
Import composite fonts
1 Click Import in the Composite Font Editor dialog box.
2 Double-click the InDesign document containing the composite fonts you want to import.
Delete a composite font
1 Select the composite font you want to delete in the Composite Font Editor dialog box.
2 Click Delete Font, and then click Yes.