
Operation Manual


44
USING ILLUSTRATOR
Workspace
Last updated 11/8/2011
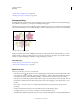
In Illustrator CS5, rulers are similar to other Creative Suite applications like InDesign and Photoshop. Illustrator
provides separate rulers for documents and artboards. You can select only one of these rulers at one point.
Note: Window rulers would be called Global rulers in this document.
Global rulers appear at the top and left sides of the illustration window. The default ruler origin is located at the top-
left corner of the illustration window.
Artboard rulers appear at the top and left sides of the active artboard. The default artboard ruler origin is located at the
top-left corner of the artboard.
The difference between artboard rulers and global rulers is that if you select artboard rulers, the origin point changes
based on the active artboard. In addition, you can have different origin points for artboard rulers. Now, if you change
the artboard ruler origin, the pattern fills in objects on the artboards are not affected.
The default origin point for the global ruler is at the upper-left corner of the first artboard and the default origin for
the artboard rulers is at the top left corner of the respective artboard.
• To show or hide rulers, choose View > Rulers > Show Rulers or View> Rulers > Hide Rulers.
• To toggle between artboard rulers and global rulers, click the View > Rulers > Change to Global Rulers or View >
Rulers > Change to Artboard Rulers. By default, artboard rulers are displayed, so Change to Global Rulers option
is displayed under Rulers sub-menu.
• To show or hide video rulers, choose View > Show Video Rulers or View > Hide Video Rulers.
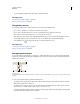
• To change the ruler origin, move the pointer to the upper-left corner where the rulers intersect, and drag the pointer
to where you want the new ruler origin.
As you drag, a cross hair in the window and in the rulers indicates the changing Global ruler origin.
Note: Changing the Global ruler origin affects the tiling of patterns.
• To restore the default ruler origin, double-click the upper-left corner where the rulers intersect.
The coordinate system has now been switched to fourth quadrant, which was previously the first quadrant. In
Illustrator CS5, when you move downwards, the value of y-axis increases and if you move toward right, the value of x-
axis increases.
For saving to legacy versions of Illustrator, the Global rulers remain at the position set in legacy document. Although,
the origin point does not move to upper left, the coordinate system changes to fourth quadrant.
The change in coordinate system and the ruler origin does not apply to scripting, which allows you to retain old scripts.
However, when you transform objects using scripting, the Y coordinate values differ from the values that you set in
the Illustrator user interface. For example, if you apply a move operation of say Y= +10 points, then to emulate the
same movement with scripting, apply a transformation of Y = -10pts.
Change the unit of measurement
The default unit of measurement in Illustrator is points (a point equals .3528 millimeter). You can change the unit that
Illustrator uses for general measurements, strokes, and type. You can override the default unit while entering values in
boxes.
• To change the default unit of measurement, choose Edit > Preferences > Units (Windows) or Illustrator >
Preferences
> Units (Mac OS), and then select units for the General, Stroke, and Type options. If Show Asian
Options is selected in the Type preferences, you can also select a unit specifically for Asian type.
Note: The “General” measurement option affects rulers, measuring the distance between points, moving and
transforming objects, setting grid and guides spacing, and creating shapes.