
Operation Manual


41
USING ILLUSTRATOR
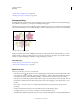
Workspace
Last updated 11/8/2011
• To view everything in the window, choose View > Fit All In Window.
More Help topics
“Moving and zooming tool gallery” on page 27
“Keys for viewing artwork” on page 478
Change the view area
You can bring a different area of the artboard into view by doing any of the following:
• Choose View > Actual Size to see all of your artboards in actual size.
• Choose View > Fit All In Window to zoom out so that all artboards are visible in on the screen.
• Choose View > Fit Artboard In Window to zoom in on the active artboard.
• In the Navigator panel, click the area of the thumbnail display that you want to view in the illustration window.
Alternatively, drag the proxy view area (the colored box) to a different area of the thumbnail display.
• Select the Hand tool , and drag in the direction you want the artwork to move.
More Help topics
“Moving and zooming tool gallery” on page 27
“Keys for viewing artwork” on page 478
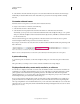
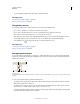
Navigator panel overview
You use the Navigator panel (Window > Navigator) to quickly change the view of your artwork using a thumbnail
display. The colored box in the Navigator (called the proxy view area) corresponds to the currently viewable area in
the illustration window.
Navigator panel
A. Thumbnail display of artwork B. Panel menu button C. Zoom box D. Zoom Out button E. Proxy preview area F. Zoom slider G. Zoom
In button
You can customize the Navigator panel in the following ways:
• To display artwork outside the boundaries of the artboard in the Navigator panel, click View Artboard Contents
Only from the panel menu to deselect it.
• To change the color of the proxy view area, select panel Options from the panel menu. Select a preset color from
the Color menu, or double-click the color box to choose a custom color.
• To display dashed lines in the document as solid lines in the Navigator panel, select panel Options from the panel
menu and select Draw Dashed Lines As Solid Lines.
A
CDE FG
B