
Operation Manual


39
USING ILLUSTRATOR
Workspace
Last updated 11/8/2011
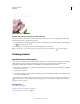
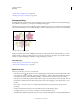
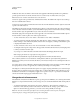
Artboard with rulers
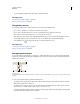
Display center mark, cross hairs, or video safe areas
The center mark, cross hairs, and video safe area are video properties that assist you in creating videos while using
Creative Suite products. To display these properties:
1 Double-click the Artboard tool in the Tools panel, or, with the Artboard tool active, click the Artboard Options
icon in the Control panel.
2 In the Display section, select the options you’d like displayed in your artboards.
Note: You can also set or remove the center point by clicking the Show Center Mark icon in the Control panel.
Viewing artwork
Specify Document Setup options
At any point you can change your document’s default setup options for units of measure, transparency grid display,
background color, and type settings such as language, quote style, superscript and subscript size, bleeds, and
exportability. The Edit Artboards button closes this dialog box and activates the Artboard tool.
1 Choose File > Document Setup, or click the Document Setup button in the Control panel. (This button is available
when nothing is selected.)
2 Specify options as desired.
3 If you want to edit artboards (for instance, to change from portrait to landscape orientation), click Edit Artboards
to enter artboard editing mode.
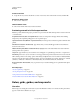
The Simulate Colored Paper option is useful if you plan to print the document on colored paper. For example, if you
draw a blue object on a yellow background, the object appears green. The simulation is only performed when the
transparency grid is not shown.
More Help topics
“Edit artboards” on page 36
“Change the unit of measurement” on page 44
“View transparency in artwork” on page 183