
Operation Manual

395
USING ILLUSTRATOR
Web graphics
Last updated 11/8/2011
The main difference between using image maps and using slices to create links is in how the artwork is exported as a
web page. Using image maps keeps the artwork intact as a single image file, while using slices causes the artwork to be
divided into separate files. Another difference between image maps and slices is that image maps enable you to link
polygonal or rectangular areas in your artwork, while slices enable you to link only rectangular areas. If you need to
link only rectangular areas, using slices may be preferable to using an image map.
Note: To avoid unexpected results, don’t create image-map hotspots in slices that contain URL links—either the image
map links or the slice links may be ignored in some browsers.
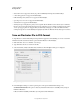
1 Select the object that you want to link to a URL.
2 In the Attributes panel, select a shape for the image map from the Image Map menu.
3 Enter a relative or full URL in the URL text box, or select from the list of available URLs. You can verify the URL
location by clicking the Browser button.
To increase the number of visible entries in the URL menu, select panel Options from the Attributes panel menu. Enter
a value from 1 to 30 to define how many URL entries you want to be displayed in the URL list.
SVG
About SVG
Bitmap image formats for the web—GIF, JPEG, WBMP, and PNG—describe images using a grid of pixels. The
resulting files tend to be bulky, limited to a single (often low) resolution, and consume large amounts of bandwidth on
the web. SVG, on the other hand, is a vector format that describes images as shapes, paths, text, and filter effects.
The
resulting files are compact and provide high-quality graphics on the web, in print, and even on resource-
constrained, handheld devices. Users can magnify their view of an SVG image on-screen without sacrificing sharpness,
detail, or clarity. In addition, SVG provides superior support for text and colors, which ensures that users will see
images as they appear on your Illustrator artboard.
The SVG format is entirely XML-based and offers many advantages to developers and users alike. With SVG, you can
use XML and JavaScript to create web graphics that respond to user actions with sophisticated effects such as
highlighting, tool tips, audio, and animation.
You can save artwork in SVG format using the Save, Save As, Save A Copy, or Save For Web & Devices command. To
access the complete set of SVG export options, use the Save, Save As, or Save A Copy command. The Save For Web &
Devices command provides a subset of SVG export options which are applicable to web-oriented work.
For a video on creating mobile content in Illustrator, see www.adobe.com/go/vid0207.
How you set up your artwork in Illustrator will affect the resulting SVG file. Keep in mind the following guidelines:
• Use layers to add structure to an SVG file. When you save artwork in SVG format, each layer is converted to a group
(<g>) element. (For
example, a layer named Button1 becomes <g id="Button1_ver3.0"> in the SVG file.) Nested
layers become SVG nested groups, and hidden layers are preserved with the display="none" SVG styling property.
• If you want objects on different layers to appear transparent, adjust the opacity of each object instead of each layer.
If you alter opacity at the layer level, the resulting SVG file will not display transparency as it appears in Illustrator.
• Raster data is not scalable in the SVG Viewer and cannot be edited like other SVG elements. If possible, avoid
creating artwork that will be rasterized in the SVG file. Gradient meshes and objects that use the Rasterize, Artistic,
Blur, Brush Strokes, Distort, Pixelate, Sharpen, Sketch, Stylize, Texture, and Video effects are rasterized when saved
in SVG format. Similarly, graphic styles that include these effects also produce rasterization. Use SVG effects to add
graphic effects without causing rasterization.