
Operation Manual


394
USING ILLUSTRATOR
Web graphics
Last updated 11/8/2011
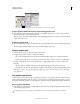
Adjust slice boundaries
If you created a slice using the Object > Slice > Make command, the position and size of the slice is tied to the artwork
it contains. Therefore, if you move or resize the artwork, the slice boundaries adjust automatically.
If you created a slice using the Slice tool, the Create From Selection command, or the Create From Guides command,
you can manually adjust slices in the following ways:
• To move a slice, drag the slice to a new position with the Slice Selection tool . Press Shift to restrict movement
to a vertical, horizontal, or 45° diagonal line.
• To resize a slice, select the slice with Slice Selection tool, and drag any corner or side of the slice. You can also use
the Selection tool and Transform panel to resize slices.
• To align or distribute slices, use the Align panel. Aligning slices can eliminate unneeded auto slices to generate a
smaller, more efficient HTML file.
• To change the stacking order of slices, drag the slice to a new position in the Layers panel or select an Object >
Arrange command.
• To divide a slice, select the slice and choose Object > Slice > Divide Slices.
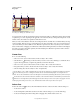
You can combine slices that were created by any method. Select the slices and choose Object > Slice > Combine Slices.
The resulting slice takes its dimensions and position from the rectangle created by joining the outer edges of the
combined slices. If the combined slices are not adjacent or are of different proportions or alignments, the new slice
may overlap other slices.
To resize all slices to the artboard boundaries, choose Object > Slice > Clip To Artboard. Slices that extend beyond the
artboard are truncated to fit the artboard and autoslices that lie within the artboard are extended to the artboard
boundaries; all artwork remains the same.
Remove slices
You can remove slices by deleting them or by releasing them from the corresponding artwork.
• To delete a slice, select the slice, and press Delete. If the slice was created using the Object > Slice > Make command,
the corresponding artwork is deleted at the same time. If you want to keep the corresponding artwork, release the
slice instead of deleting it.
• To delete all slices, choose Object > Slice > Delete All. Slices created with the Object > Slice > Make command are
released, not deleted.
• To release a slice, select the slice and choose Object > Slice > Release.
Show or hide slices
• To hide slices in the illustration window, choose View > Hide Slices.
• To hide slices in the Save For Web & Devices dialog box, click the Toggle Slices Visibility button .
• To hide slice numbers and change the color of slice lines, choose Edit > Preferences > Smart Guides & Slices
(Windows) or Illustrator
> Preferences > Smart Guides & Slices (Mac OS).
Create image maps
Image maps enable you to link one or more areas of an image—called hotspots—to a URL. When a user clicks on the
hotspot, the web browser loads the linked file.