
Operation Manual


377
USING ILLUSTRATOR
Creating special effects
Last updated 11/8/2011
Distort effects (bottom of menu)
The Distort commands can be very memory-intensive. They are raster-based and use the document’s raster effects
settings whenever you apply the effect to a vector object.
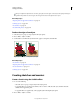
Diffuse Glow Renders an image as if it were being viewed through a soft diffusion filter. The effect adds see-through
white noise to an image, with the glow fading from the center of a selection.
Glass Makes an image appear as if it were being viewed through different types of glass. You can choose a preset glass
effect or create your own glass surface using a Photoshop file. You can adjust scaling, distortion, and smoothness
settings, as well as texturizing options.
Ocean Ripple Adds randomly spaced ripples to the artwork, making the artwork look as if it were under water.
More Help topics
“Use texture and glass surface controls” on page 379
“Effects quick reference” on page 373
Pixelate effects
The Pixelate effects are raster-based and use the document’s raster effects settings whenever you apply the effect to a
vector object.
Color Halftone Simulates the effect of using an enlarged halftone screen on each channel of the image. For each
channel, the effect divides the image into rectangles and replaces each rectangle with a circle. The circle size is
proportional to the brightness of the rectangle.
To use the effect, enter a value in pixels for the maximum radius of a halftone dot (from 4 to 127), and enter a screen-
angle value (the angle of the dot relative to the true horizontal) for one or more channels. For Grayscale images, use
only channel 1. For RGB images, use channels 1, 2, and 3, which correspond to the red, green, and blue channels. For
CMYK images, use all four channels, which correspond to the cyan, magenta, yellow, and black channels.
Crystallize Clumps colors into polygon shapes.
Mezzotint Converts an image to a random pattern of black-and-white areas, or of fully saturated colors in a color
image. To use the effect, choose a dot pattern from the Type pop-up menu in the Mezzotint dialog box.
Pointillize Breaks up the color in an image into randomly placed dots, as in a pointillist painting, and uses the
background color as a canvas area between the dots.
More Help topics
“Effects quick reference” on page 373
Sharpen effect
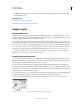
The Unsharp Mask command in the Sharpen submenu in the Effect menu focuses blurry images by increasing the
contrast of adjacent pixels. This effect is raster-based and uses the document’s raster effects settings whenever you
apply the effect to a vector graphic.
Unsharp Mask Finds the areas in the image where significant color changes occur and sharpens them. Use the
Unsharp Mask effect to adjust the contrast of edge detail and produce a lighter and darker line on each side of the edge.
This effect emphasizes the edge and creates the illusion of a sharper image.