
Operation Manual

374
USING ILLUSTRATOR
Creating special effects
Last updated 11/8/2011
Effect > Crop Marks Applies crop marks to the selected object.
See also: “Specify crop marks for trimming or aligning” on page 47
Effect > Distort & Transform
(top section of menu)
Reshape vector objects, or apply the effects to a fill or stroke added to a bitmap object with the Appearance
panel.
See also: “Reshaping objects with effects” on page 257
Effect > Distort
(bottom section of menu)
Geometrically distort and reshape an image.
See also: “Distort effects (bottom of menu)” on page 377
Effect > Path Offset an object’s path relative to its original location, turn type into a set of compound paths that you can
edit and manipulate as you would any other graphic object, and change the stroke of a selected object to a
filled object that’s the same width as the original stroke. You can also apply these commands to a fill or stroke
added to a bitmap object with the Appearance panel.
See also: “Offset duplicate objects” on page 231, “Convert type to outlines” on page 330, “Convert strokes to
compound paths” on page 158
Effect > Pathfinder Combine groups, layers, or sublayers into single editable objects.
See also: “Apply Pathfinder effects” on page 244
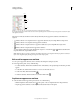
Effect > Pixelate Sharply define a selection by clumping pixels of similar color values.
See also: “Pixelate effects” on page 377
Effect > Rasterize Convert a vector object to a bitmap object.
See also: “Rasterize a vector object” on page 286
Effect > Sharpen Focus blurry images by increasing the contrast of adjacent pixels.
See also: “Sharpen effect” on page 377
Effect > Sketch Add texture to images, often for a three-dimensional effect. The effects are also useful for creating a fine-arts
or hand-drawn look.
See also: “Sketch effects” on page 378
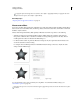
Effect > Stylize
(top section of menu)
Add arrowheads, drop shadows, round corners, feathered-edged, glowing, and scribble-styled appearances
to objects.
See also: “Create a drop shadow” on page 380, “Apply an inner or outer glow” on page 380, “Add
arrowheads” on page 156, “Feather the edges of an object” on page 381, “Create a sketch using the Scribble
effect” on page 381, “Round the corners of objects” on page 257
Effect > Stylize
(bottom section of menu)
The Glowing Edges command produces a painted or impressionistic effect on a selection by displacing pixels
and by finding and heightening contrast in an image.
See also: “Stylize effect (bottom of menu)” on page 378
Effect > SVG Filters Add XML-based graphic properties such as drop shadows to your artwork.
See also: “Apply SVG effects” on page 396
Effect > Texture Give an image the appearance of depth or substance, or add an organic look.
See also: “Texture effects” on page 379
Effect > Video Optimize images captured from video or artwork intended for television.
See also: “Video effects” on page 379
Effect > Warp Distort or deform objects, including paths, text, meshes, blends, and raster images.
See also: “Reshaping objects with effects” on page 257
Effect Action