
Operation Manual


312
USING ILLUSTRATOR
Type
Last updated 11/8/2011
4 For Min, specify the value for the baseline offset.
More Help topics
“Shift the baseline” on page 333
“Display Asian type options” on page 351
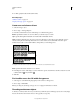
Create rows and columns of text
1 Select an area type object.
2 Choose Type > Area Type Options.
3 In the Rows and Columns sections of the dialog box, set the following options:
Number Specifies the number of rows and columns you want the object to contain.
Span Specifies the height of individual rows and the width of individual columns.
Fixed Determines what happens to the span of rows and columns if you resize the type area. When this option is
selected, resizing the area can change the number of rows and columns, but not their width. Leave this option
deselected if you want row and column widths to change when you resize the type area.
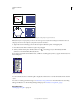
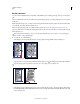
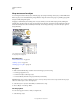
Options for resizing rows and columns
A. Original columns B. Columns resized with Fixed selected C. Columns resized with Fixed deselected
Gutter Specifies the distance between rows or columns.
4 In the Options section of the dialog box, select a Text Flow option to determine how text flows between rows and
columns: By Rows
or By Columns .
5 Click OK.
Fit a headline across the full width of a type area
1 Select a type tool, and click in the paragraph you want to fit across the type area.
2 Choose Type > Fit Headline.
Note: If you change the formatting of the type, be sure to reapply the Fit Headline command.
Threading text between objects
To thread (or continue) text from one object to the next, you link the objects. Linked type objects can be of any shape;
however, the text must be entered in an area or along a path (not at a point).
A
B
C