
Operation Manual

264
USING ILLUSTRATOR
Reshaping objects
Last updated 11/8/2011
Lighting Adds one or more lights, varies the light intensity, changes the object’s shading color, and moves lights
around the object, for dramatic effects. (See
“Lighting options” on page 266.)
Map Maps artwork onto the surfaces of a 3D object. (See “Map artwork to a 3D object” on page 268.)
5 Click OK.
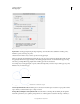
Set 3D rotation position options
❖ Do any of the following:
• Choose a preset position from the Position menu.
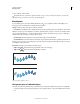
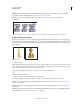
• For unconstrained rotation, drag a track cube face. The front of the object is represented by the track cube’s blue
face, the object’s top and bottom faces are light gray, the sides are medium gray, and the back face is dark gray.
•
To constrain the rotation along a global axis, hold down Shift while dragging horizontally (global y axis) or vertically
(global x axis). To rotate the object around the global z axis, drag in the blue band that surrounds the track cube.
• To constrain the rotation around an object axis, drag an edge on the track cube. The pointer changes to a double-
sided arrow
, and the cube edge changes color to identify the axis around which the object will rotate. Red edges
represent the object’s x axis, green edges represent the object’s y axis, and blue edges represent the object’s z axis.
• Enter values between –180 and 180 in the horizontal (x) axis , vertical (y) axis , and depth (z) axis text
boxes.
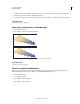
• To adjust the perspective, enter a value between 0 and 160 in the Perspective text box. A smaller angle is similar to
a telephoto camera lens; a larger lens angle is similar to a wide-angle camera
lens.
Note: A lens angle that is higher than 150 may result in objects extending beyond your point of view and appearing
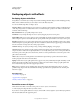
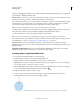
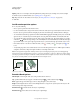
distorted. Also, keep in mind that there are object x, y, and z axes and global x, y, and z axes. Object axes remain relative
to an object’s position in its 3D space. Global axes remain fixed relative to the computer screen; the x axis lies horizontally,
the y axis lies vertically, and the z axis lies perpendicular to the computer screen.
Object axes (in black) move with the object; global axes (in gray) are fixed.
Extrude & Bevel options
Extrude Depth Sets the depth of the object, using a value between 0 and 2000.
Cap Specifies whether the object appears solid (Revolve Cap On ) or hollow (Revolve Cap Off ).
Bevel Applies the type of beveled edge you choose along the depth (z axis) of the object.
Height Sets the height between 1 and 100. Bevel heights that are too large for an object may cause the object to self-
intersect and produce unexpected results.
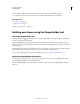
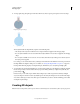
Bevel Extent Out Adds the bevel to the object’s original shape.
Bevel Extent In Carves the bevel out of the object’s original shape.
y
x
y
x
y
z
x
y
z
x