
Operation Manual


245
USING ILLUSTRATOR
Reshaping objects
Last updated 11/8/2011
Exclude Traces all nonoverlapping areas of the objects, and makes overlapping areas transparent. Where an even
number of objects overlap, the overlap becomes transparent. Where an odd number of objects overlap, the overlap
becomes filled.
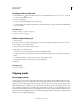
Subtract Subtracts the frontmost objects from the backmost object. You can use this command to delete areas of an
illustration by adjusting the stacking order.
Minus Back Subtracts the objects in back from the frontmost object. You can use this command to delete areas of an
illustration by adjusting the stacking order.
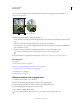
Divide Separates a piece of artwork into its component filled faces (a face is an area undivided by a line segment).
Note: When you use the Divide button in the Pathfinder panel, you can use the Direct Selection or Group Selection tool
to manipulate the resulting faces independently of each other. You can also choose to delete or preserve unfilled objects
when applying the Divide command.
Trim Removes the part of a filled object that is hidden. It removes any strokes and does not merge objects of the same
color.
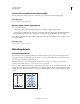
Merge Removes the part of a filled object that is hidden. It removes any strokes and merges any adjoining or
overlapping objects filled with the same color.
Crop Divides artwork into its component filled faces, and then deletes all the parts of the artwork that fall outside the
boundary of the topmost object. It also removes any strokes.
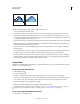
Outline Divides an object into its component line segments, or edges. This command is useful for preparing artwork
that needs a trap for overprinting objects. (See
“Create a trap” on page 443.)
Note: When you use the Outline button in the Pathfinder panel, you can use the Direct Selection or Group Selection tool
to manipulate each edge independently. You can also choose to delete or preserve unfilled objects when applying the
Outline command.
Hard Mix Combines colors by choosing the highest value of each of the color components. For example, if Color 1 is
20% cyan, 66% magenta, 40% yellow, and 0% black; and Color 2 is 40% cyan, 20% magenta, 30% yellow, and 10% black,
the resulting hard color is 40% cyan, 66% magenta, 40% yellow, and 10% black.
Soft Mix Makes the underlying colors visible through the overlapping artwork, and then divides the image into its
component faces. You specify the percentage of visibility you want in the overlapping colors.
Trap Compensates for potential gaps between colors in artwork by creating a small area of overlap (called a trap)
between two adjoining colors.
More Help topics
“Mix overlapping colors” on page 150
“Trapping” on page 443
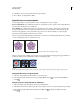
About compound shapes
A compound shape is editable art consisting of two or more objects, each assigned a shape mode. Compound shapes
make it easy to create complex shapes because you can precisely manipulate the shape mode, stacking order, shape,
location, and appearance of each path included.
Compound shapes act as grouped objects and appear as <Compound Shape> items in the Layers panel. You can use
the Layers panel to show, select, and manipulate the contents of a compound shape—for example, to change the
stacking order of its components. You can also use the Direct Selection tool or the Group Selection tool to select
components of a compound shape.