
Operation Manual


221
USING ILLUSTRATOR
Selecting and arranging objects
Last updated 11/8/2011
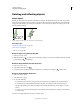
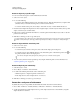
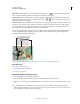
Rotating the axes is useful if your artwork consists of elements that are rotated to the same angle, such as a logo and
text displayed on a 20° angle. Instead of rotating each element you add to the logo, you can simply rotate the axes
by 20°. Everything you draw is created along the new axes.
Object aligned with default axes (left) compared to alignment with axes rotated 20° (right)
The following objects and actions are not affected by the new axes:
• Objects that already exist
• Rotating and blending
• Drawing with the Pencil or Live Trace tool
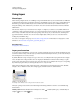
Reflect or flip objects
Reflecting an object flips the object across an invisible axis that you specify. You can reflect objects using the Free
Transform tool, the Reflect tool, or the Reflect command. If you want to specify an axis from which to reflect, use the
Reflect tool.
To create a mirror image of an object, you can copy while reflecting.
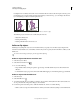
Reflect an object with the Free Transform tool
1 Select the object to reflect.
2 Select the Free Transform tool .
3 Do one of the following:
• Drag a handle of the bounding box past the opposite edge or handle until the object is at the desired level of
reflection.
• To maintain the object’s proportions, hold down Shift while dragging a corner handle past the opposite handle.
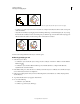
Reflect an object with the Reflect tool
1 Select the object.
2 Select the Reflect tool .
3 To draw the invisible axis across which you want the object to reflect, click anywhere in the document window to
set one point of the axis. The
pointer changes to an arrowhead.
4 Position the pointer at another point to define the invisible axis, and do one of the following:
• Click to set the second point of the invisible axis. When you click, the selected object flips over the defined axis.
x
y
20
x
y
y